|
|
|
|
|
 |
Pacific Motorway, Riverside Expressway, Coronation Drive, Hale Street, Inner City Bypass, Bowen Bridge Road, Lutwyche Road, Gympie Road & Gympie Arterial Road (Metroad 3) (Decommissioned) - Brisbane to Bald Hills |
Statistics:
Route Numbering:


General Information:
The route takes in the Brisbane's inner south and also skirts the CBD via what was once called the Riverside Expressway, then continues into the northern suburbs via Coronation Drive, Hale Street and the Inner City Bypass before connecting with Bowen Bridge Road, Lutwyche Road, Gympie Road and finally the Gympie Arterial Road for the connection to the Bruce Highway at the Gateway Motorway (M1) junction.
Multiplexes along the route include:History:
| Brisbane to Bald Hills | Bald Hills to Brisbane | |||
| Preview: | Description: | Preview: | Description: | |
|
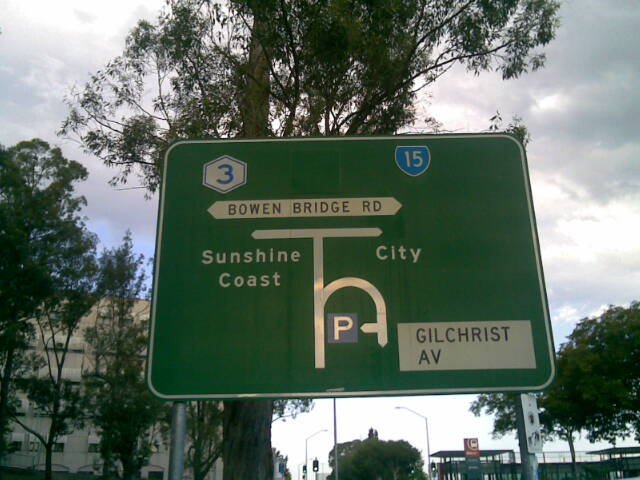
Advance
Directional Sign: Unusual diagrammatic AD sign on Herston Rd in Herston, approaching the intersection with Bowen Bridge Rd in Herston. Technically this section of Bowen Bridge Rd is SR15, the start of Metroad 3, when still current, was another 600m north. September 2007. Image © Paul Rands |

|
Advance
Directional Sign: Southbound AD sign on Bruce Hwy at Griffin approaching the interchange with Gateway Mwy (M1) and Gympie Arterial Rd (formerly Metroad 3). March 2006. Image © Paul Rands |
|
|
Albion
Road Intersection: Albion Road in Windsor, as it meets Lutwyche Road between Roblane Street and Truro Street. March 2006. Image © Paul Rands |

|
Advance
Directional Sign: Gantry Bruce Hwy (M1) at Griffin with AD signs approaching the interchange with Gateway Mwy (M1) and Gympie Arterial Rd (formerly Metroad 3). March 2006. Image © Paul Rands |
|

|
Chalk
Street Intersection: Lutwyche town centre near the Chalk Street intersection. March 2006, as you head north along Lutwyche Road. Image © Paul Rands |

|
Gateway
Mwy / Gympie Arterial Rd Interchange: Southbound at Bald Hills on the Bruce Hwy (M1) at the interchange with Gateway Mwy (M1) and Gympie Arterial Rd (formerly Metroad 3). March 2006. Image © Paul Rands |
|
|
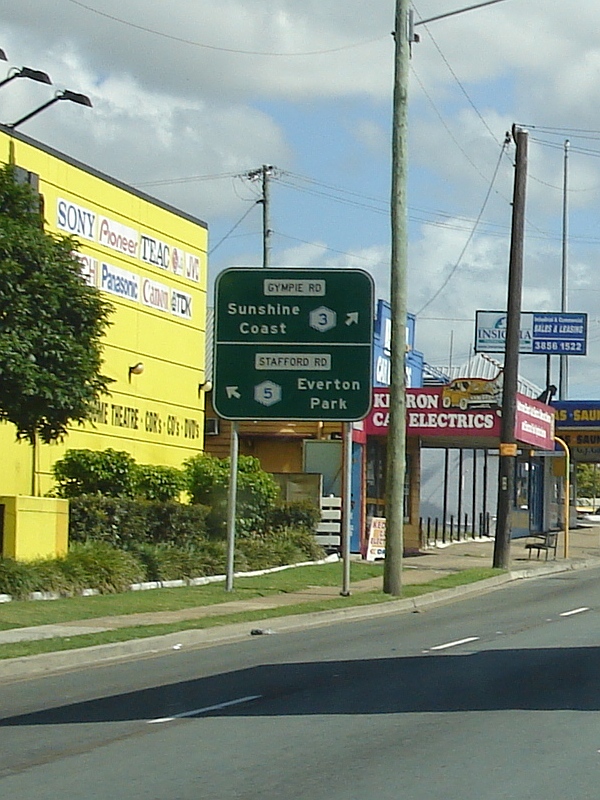
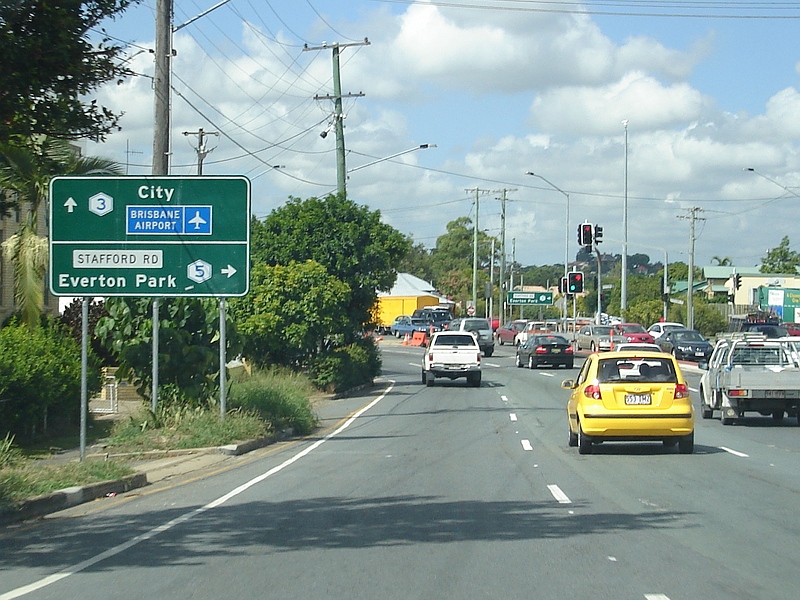
Advance
Directional Sign: AD sign approaching Stafford Road (Metroad 5) in Kedron. March 2006. Image © Paul Rands |

|
Gateway
Mwy / Gympie Arterial Rd Interchange: Southbound on the Bruce Hwy (M1) at the interchange with Gateway Mwy (M1) and Gympie Arterial Rd (formerly Metroad 3). March 2006. Image © Paul Rands |
|
 |
AD Sign: Advance directional sign on Gympie Rd at Kedron, approaching Rode Rd. March 2006. Image © Paul Rands |
 |
Linkfield
Road Interchange: ID sign at the on ramp from Linkfield Rd (SR40) to Gympie Arterial Rd & Gympie Rd (Metroad 3) at Carseldine, October 2004. Image © Michael Greenslade |
|
 |
Approaching
Murphy Road: AD sign approaching the intersection with Murphy Rd in Chermside. March 2006. Image © Paul Rands |
 |
Advance
Directional Sign: AD sign on Gympie Rd (Metroad 3) at Aspley approaching Gayford St, October 2004. Note the new poles in front of the sign for its replacement. Image © Michael Greenslade |
|
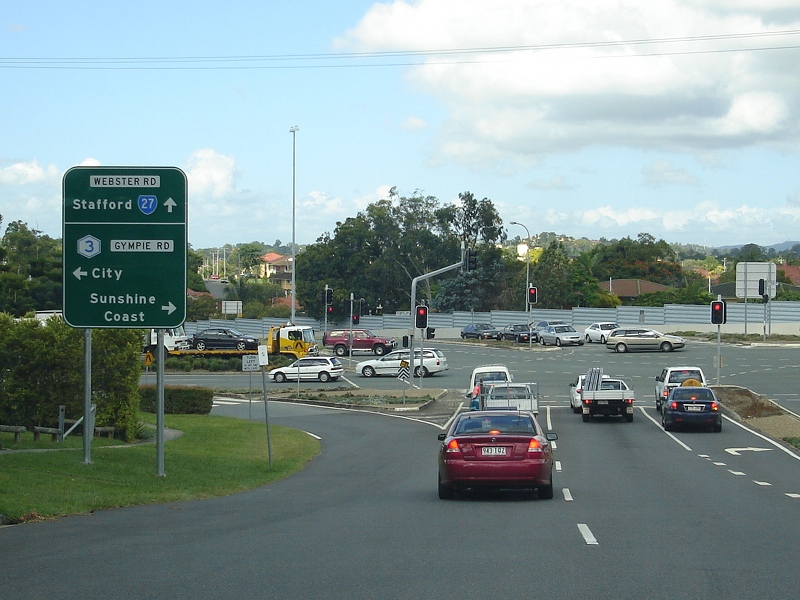 |
Advance
Directional Sign: AD sign on Ellison Rd (SR27) in Aspley approaching Gympie Rd (Metroad 3) and Webster Rd (SR27). March 2006. Image © Paul Rands |
|
RD sign: Distance sign at Chermside on Gympie Road, March 2006, after the intersection with Ellison and Webster Roads (SR27). Image © Paul Rands |
|
 |
Distance
Sign: Reassurance directional sign at Aspley, October 2005. Image © Paul Rands |

|
Approaching
Murphy Road: AD sign approaching the intersection with Murphy Rd in Chermside. March 2006. Click here for a photo of this location by Michael Greenslade featuring a black sign from October 2004. Image © Paul Rands |
|
 |
Black
Advance Directional Sign: Black AD sign on Gympie Rd (Metroad 3) approaching Albany Creek Rd at Aspley, October 2004. This sign and signals have since been replaced. Image © Michael Greenslade |

|
AD Sign: Advance directional sign on Gympie Rd at Chermside, approaching Rode Rd. March 2006. Image © Paul Rands |
|
 |
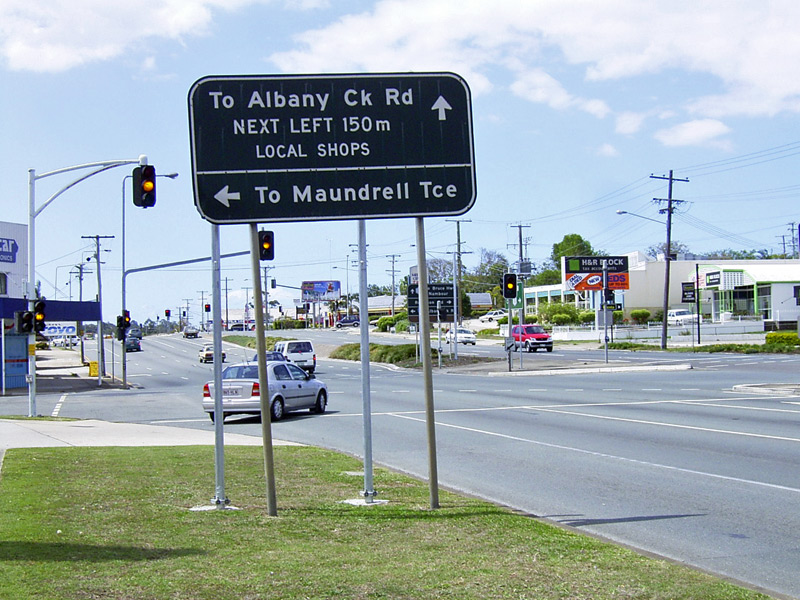
Advance
Directional Sign: AD sign on Albany Ck Rd at Aspley approaching Gayford St and Maundrell Tce, October 2004. Gayford St acts as a connector to Gympie Rd (Metroad 3). This sign has since been replaced. Image © Michael Greenslade |
|
Advance
Directional Sign: AD sign approaching Stafford Road (Metroad 5) in Kedron. March 2006. Image © Paul Rands |
|
 |
Intersection
Directional Sign: ID sign on Albany Ck Rd at Aspley at the junction with Gayford St and Maundrell Tce, October 2004. Gayford St acts as a connector to Gympie Rd (Metroad 3). This sign has since been replaced. Image © Michael Greenslade |

|
Advance
Directional Sign: AD sign on Gympie Rd in Kedron, approaching Kedron Park Rd (SR20), March 2006. Image © Paul Rands |
|
 |
Advance
Directional Sign: AD sign on Gympie Rd in Aspley approaching Albany Ck Rd and Robinson Rd (SR28). October 2005. Image © Paul Rands |
|
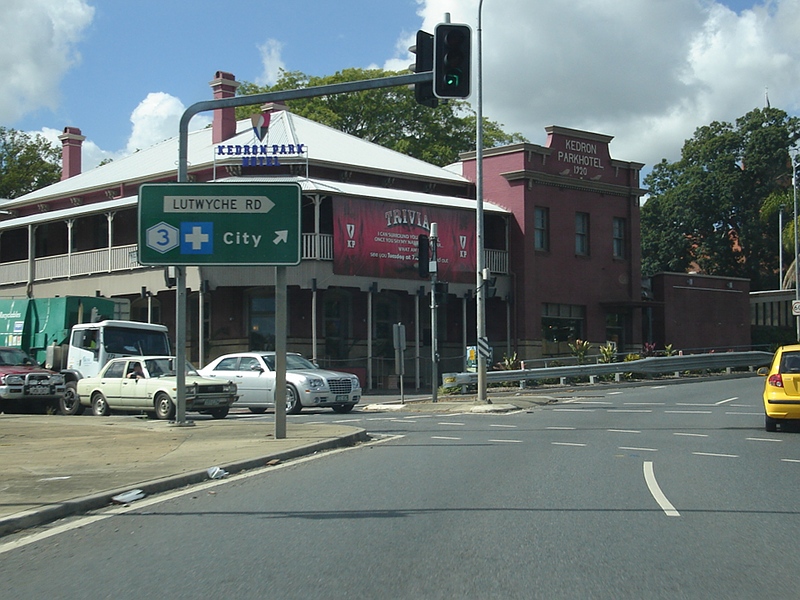
Kedron
Park Road Intersection: Gympie Road as it changes to Lutwyche Road at the junction with Kedron Park Road in Wooloowin. March 2006. Image © Paul Rands |
|
 |
Approaching
Beams Road: AD sign in Carseldine approaching Beams Rd, October 2005. Image © Paul Rands |

|
Chalk
Street Intersection: Lutwyche town centre near the Chalk Street intersection. March 2006, as you head south along Lutwyche Road. Image © Paul Rands |
|
 |
Distance
Sign: Distance sign after the Beams Rd intersection in Carseldine, October 2004. |
|
Approaching
Lutwyche Rd & Truro Rd Split: AD sign as you approach the first split for southbound traffic along Metroad 3. Both Lutwyche Rd and and Truro St were Metroad 3 in Lutwyche. March 2006. Image © Paul Rands |
|
 |
Advance
Directional Sign: AD sign on Gympie Rd approaching the interchange with Gympie Rd and Gympie Arterial Rd at Carseldine, October 2005. |

|
Approaching
Lutwyche Rd & Truro Rd Split: The first split for southbound traffic along Metroad 3. Both Lutwyche Rd and and Truro St were Metroad 3 in Lutwyche. March 2006. Image © Paul Rands |
|
 |
Advance
Directional Sign: AD sign approaching Linkfield Rd (SR40) and Gympie Arterial Rd (Metroad 3) at Carseldine, October 2004. Image © Michael Greenslade |

|
Entering
Windsor: Truro Street (Metroad 3) as you enter Windsor near Ada Street, March 2006. Image © Paul Rands |
|
 |
Freeway
Green Advance Directional Sign: Freeway green and standard green AD sign approaching Linkfield Rd (SR40) and Gympie Arterial Rd (Metroad 3) at Carseldine, October 2004. This sign has since been replaced. Image © Michael Greenslade |

|
Approaching
Newmarket Road: AD sign as you approaching Newmarket Rd in Windsor, southbound on Lutwyche Rd, March 2006. Image © Paul Rands |
|
 |
Freeway
Green Advance Directional Sign: Freeway green and standard green AD sign approaching Linkfield Rd (SR40) and Gympie Arterial Rd (Metroad 3) at Carseldine, October 2004. Note the poles in front of the sign for its replacement. Image © Michael Greenslade |
|
Advance
Directional Sign: AD sign approaching Bowen Bridge Rd (SR15) and Inner City Bypass at Windsor. March 2006. This area has had significant changes since this image was taken as a result of the works for the Clem 7 tunnel. Image © Paul Rands |
|
 |
Gympie
Road & Linkfield Road Interchange: ID sign at the Gympie Rd & Linkfield Rd (SR40) interchange at Carseldine. October 2004. Image © Michael Greenslade |

|
Inner
City Bypass Access Road: Access road between Bowen Bridge Rd & Lutwyche Rd and the Inner City Bypass at Windsor. March 2006. Image © Paul Rands |
|
 |
Gympie
Road & Linkfield Road Interchange: ID sign at the Gympie Rd & Linkfield Rd (SR40) interchange at Carseldine. October 2004. |

|
Horace
Street Intersection: Corner of Horace St and Inner City Bypass at Windsor. This intersection no longer exists as a result of the Clem 7 Tunnel works. March 2006. Image © Paul Rands |
|
 |
Advance
Directional Sign: AD sign near the Linkfield Rd bridge at Bald Hills for the interchange with Strathpine Rd (SR58) and Hoyland St. October 2005. Image © Paul Rands |

|
Entering
Tunnel: Entering the tunnel under O'Connell Tce and the RNA Showgrounds at Fortitude Valley, March 2006. Image © Paul Rands |
|
 |
Advance
Directional Sign: AD sign on Strathpine Rd (SR58) approaching the interchange with Gympie Arterial Rd (Metroad 3) and Hoyland St at Bald Hills. March 2006. Image © Paul Rands |

|
Tunnel
Interior: Inside the tunnel under O'Connell Tce and the RNA Showgrounds at Fortitude Valley, March 2006. Image © Paul Rands |
|
 |
End
Metroad 3 500m: Sign indicating Metroad 3 ends in 500m at Bald Hills. March 2006. Image © Paul Rands |
|
Inner
City Bypass: The ICB, looking southwest at Spring Hill. March 2006. Image © Paul Rands |
|
 |
End
Metroad 3: Northern terminus of what was once Metroad 3 - the interchange with Bruce Hwy and Gateway Mwy (M1) at Bald Hills. March 2006. Image © Paul Rands |
|
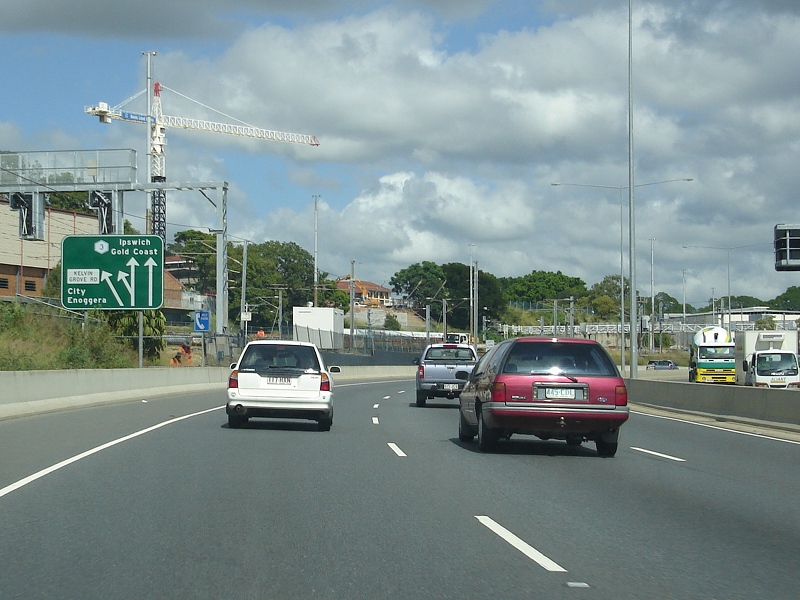
Advance
Directional Sign: AD sign on the Inner City Bypass, approaching Kelvin Grove Rd (SR77) at Spring Hill. March 2006. Image © Paul Rands |
|
|
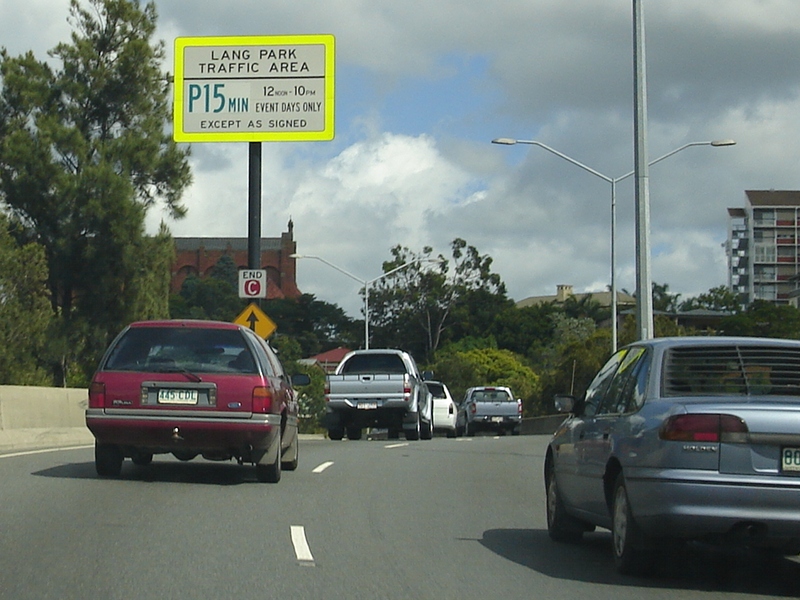
Inner
City Bypass at Kelvin Grove: Old Lang Park (now Suncrop Stadium) parking restrictions sign on Inner City Bypass at Kelvin Grove. March 2006. Image © Paul Rands |
|||
 |
Hale Street: Southbound on Hale St (Metroad 3) near Regent St and Hale St Service Road at Paddington, May 2005. Image © Michael Greenslade |
|||
| Click here for the continuation of Metroad 3 between Brisbane and Eight Mile Plains | ||||
1 State Road
Network of Queensland Map, 30 June 2008
2 State Library of Queensland Web Site
3 Busway Website History Web Page
4 Main Roads Gympie Road Upgrade Web
Page
5 Michael Greenslade
Last updated: 26-Oct-2021 1:18
This site © Paul Rands. All rights reserved. Some portions © (copyright) by their respective and credited owners. Permission must be obtained before using any images from this site. For details, please email by clicking here.