|
|
|
|
|
| M1 A1 | Pacific Motorway, Gateway Motorway & Bruce Highway (M1 / A1) - Loganholme to Eight Mile Plains |
Statistics:
Route Numbering:


General Information:
The M1 / A1 corridor is the main coastal route from the NSW border to the northern tip of the east coast of Australia, and links major cities and towns with Brisbane, and beyond the NSW border, Sydney.
Pacific Motorway:
The M1 portion of the Pacific Motorway bypasses the suburban areas of the Gold Coast and outer Brisbane areas, and passes through residential, commercial and industrial areas, and features a number of service roads to cater to some of the industrial and commercial zones.
The section from Brisbane to Springwood is formerly known as the South Eastern Freeway.
The Pacific Motorway passes several Gold Coast tourist attractions such as Warner Bros. Movie World, Wet 'n' Wild Water World, and Dreamworld.
The route features twin tunnels bypass the Tugun area as it crosses into NSW.
History:
Pacific Motorway:
- 1927: Start of the formation and bitumening of the Pacific Highway in Logan area. 2
- 1930s: Pacific Highway named. 3
- 1 July 1931: Logan Bridge built to military specifications to bear the weight of a small tank. 2 3
- 1963: Work began on the Beenleigh Bypass on the Pacific Highway, and included a new bridge at Yatala to replace the existing timber bridge over the Albert River. 3
- 1965: Brisbane Transportation Study recommended the construction of the South East Freeway. 2
- December 1965: Southbound carriageway opened as two lanes on Beenleigh Bypass. 4
- December 1966: Northbound carriageway completed on Beenleigh Bypass. 4
- 1968: New bridge over the river at Loganholme was built in conjunction with the duplication of the Pacific Highway. 2
- November 1972: The first section, opened in Brisbane, was originally known as the Southeast Freeway. 5
- 25 September 1979: Watland Street / Park Road interchange opened. 4
- 1985: Completion of South East Freeway, from Brisbane to Springwood. 6
- December 1996: Motorway upgrade to 6 lanes between Winnetts Road to Beenleigh-Redland Bay Road. 7
- October 2000: Motorway standard upgrade of Pacific Highway between the junction of Logan Motorway and Nerang opened to traffic. 8
- November 2009: Construction of interchange upgrades commenced between Springwood and Daisy Hill. 9
- May 2010: The first stage of the new Loganlea Road overpass bridge commenced. 10
- November 2012: Upgrades between Springwood and Daisy Hill completed. 9
- April 2013: Construction started on a 1.8 km lane on the Pacific Motorway in the southbound direction between Fitzgerald Avenue and Shortland Street. 1
Click here for the former alignment between Loganholme and Eight Mile Plains
| Loganholme to Eight Mile Plains | Eight Mile Plains to Loganholme | |||
| Preview: | Description: | Preview: | Description: | |
 |
Logan Motorway Interchange: Intersection directional sign at the Logan Mwy (M6) interchange at Loganholme, July 2018. Click here for a photo of this location by Rob Tilley from February 2009. Image © Rob Tilley |
 |
Start M1: Sign showing the change in route number at Eight Mile Plains, March 2006. This sign has since been altered to show M3 instead of Metroad 3. Image © Paul Rands |
|
 |
Logan Motorway Interchange: Pacific Mwy (M1) at the interchange with Logan Mwy (M6) at Loganholme, February 2009. Image © Rob Tilley |
 |
Reassurance Directional Sign: Distance sign at Rochedale after the Gateway Mwy (M1 / M2) interchange, May 2019. Click here for a photo by Rob Tilley of this location from February 2015. Click here for a photo by Rob Tilley from November 2010. Click here for a photo of this location by Paul Rands from March 2006. Image © Dean Sherry |
|
 |
Advance Directional Sign: AD sign at Loganholme for Beenleigh-Redland Bay Rd (SR47), July 2018. Click here for a photo of this location by Rob Tilley from February 2009. Image © Rob Tilley |
 |
Advance Directional Signs: AD signs on the Underwood Rd overpass at Rochedale, March 2006. Image © Paul Rands |
|
 |
Supplemental Advance Directional Sign: Supplemental AD sign at Loganholme for Beenleigh-Redland Bay Rd (SR47), June 2012. Image © Justin Cozart |
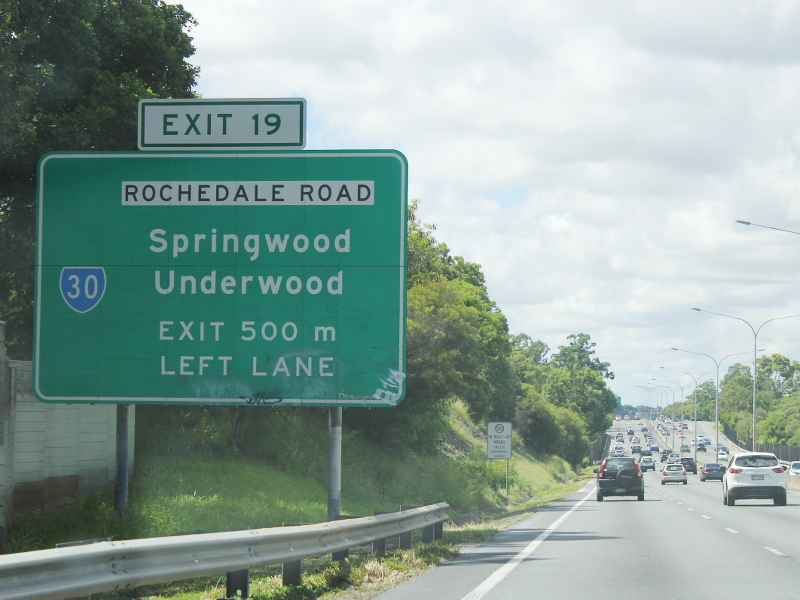 |
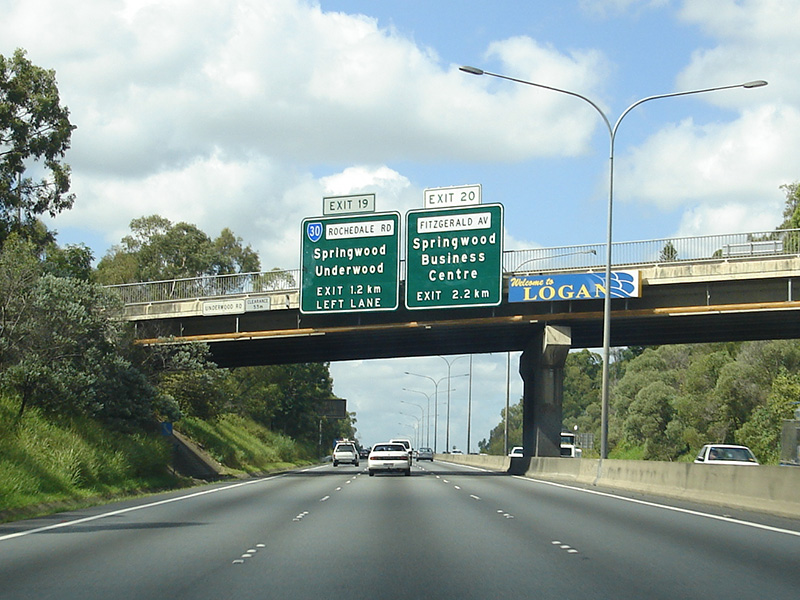
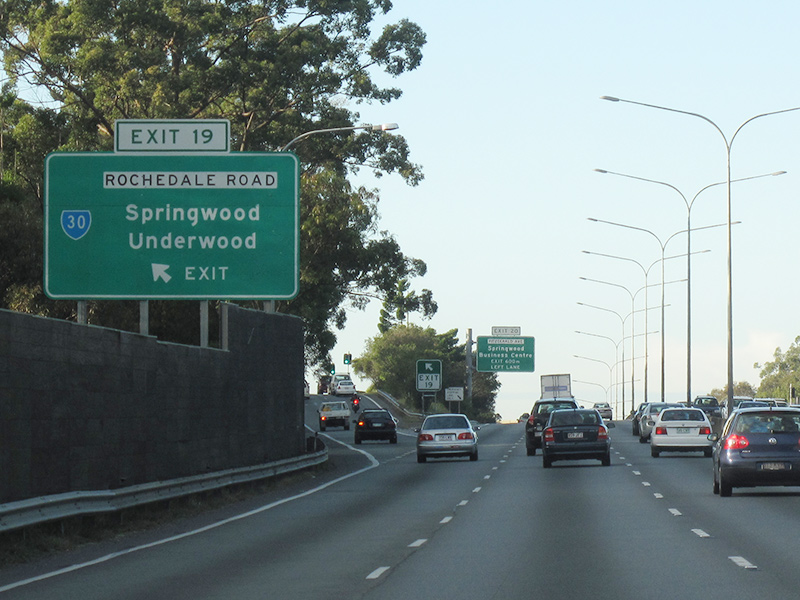
Freeway Green Advance Directional Sign: Freeway green AD sign at Rochedale South approaching Rochedale Rd (SR30), February 2015. Click here for a photo by Paul Rands from March 2006. Image © Rob Tilley |
|
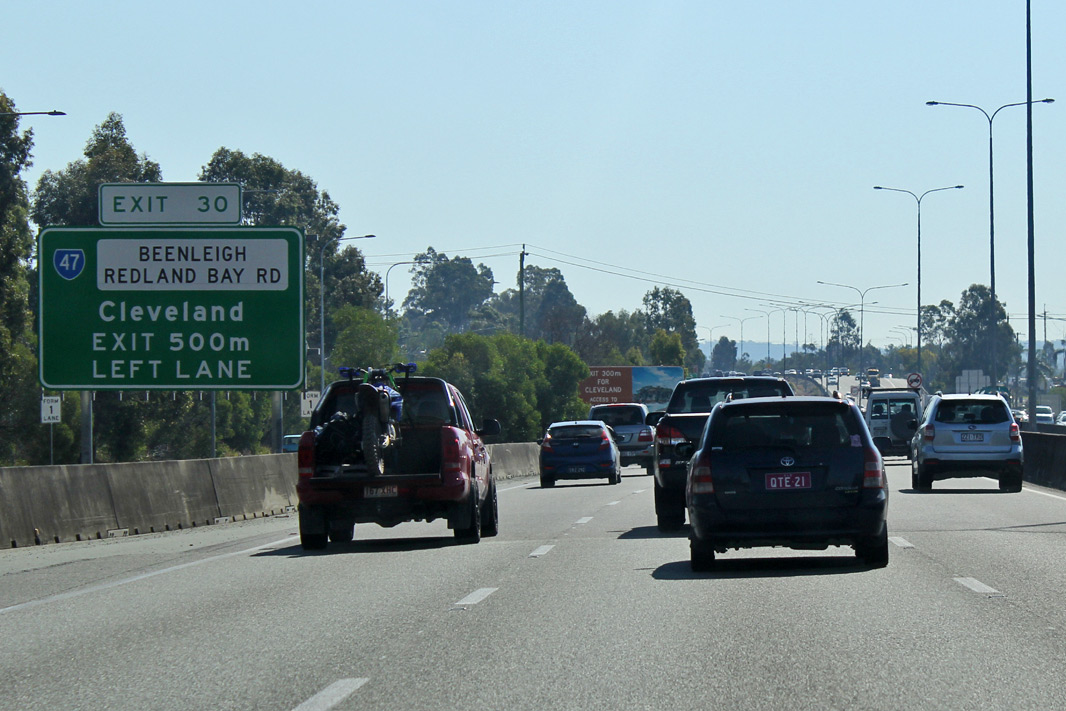 |
Advance Directional Sign: AD sign at Loganholme for Beenleigh-Redland Bay Rd (SR47), July 2018. Click here for a photo of this location by Rob Tilley from February 2009. Image © Rob Tilley |
 |
Freeway Green Intersection Directional Sign: Freeway green ID sign at the Rochedale Rd (SR30) interchange at Rochedale South, June 2012. Image © Justin Cozart |
|
 |
Supplemental Advance Directional Sign: Supplemental AD sign at Loganholme for Beenleigh-Redland Bay Rd (SR47), July 2018. Click here for a photo of this location by Rob Tilley from February 2009. Image © Rob Tilley |
 |
Advance Directional Sign: AD sign on the Rocheadale Rd (SR30) off ramp at Rochedale South, March 2009. Image © Rob Tilley |
|
 |
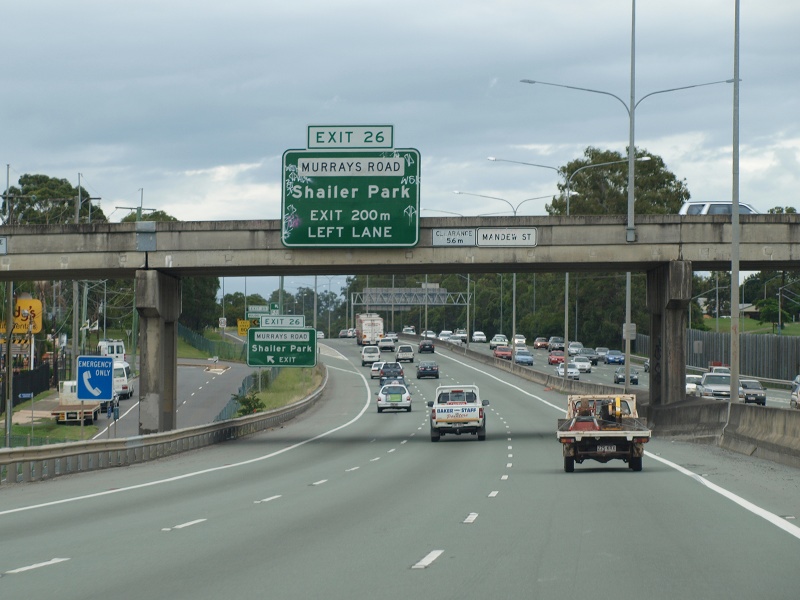
Supplemental Advance Directional Sign: Supplemental AD sign at Loganholme for Murrays Rd, July 2018. Image © Rob Tilley |
 |
Advance Directional Sign: AD sign at Rochedale South approaching Fitzgerald Av, March 2009. Image © Rob Tilley |
|
 |
Beenleigh-Redland Bay Road Interchange: Pacific Mwy (M1) at the interchange with Beenleigh-Redland Bay Rd (SR47) at Loganholme, February 2009. Image © Rob Tilley |
 |
Fitzgerald Avenue Interchange: Pacific Mwy (M1) at the Fitzgerald Av interchange at Springwood, June 2012. Image © Justin Cozart |
|
 |
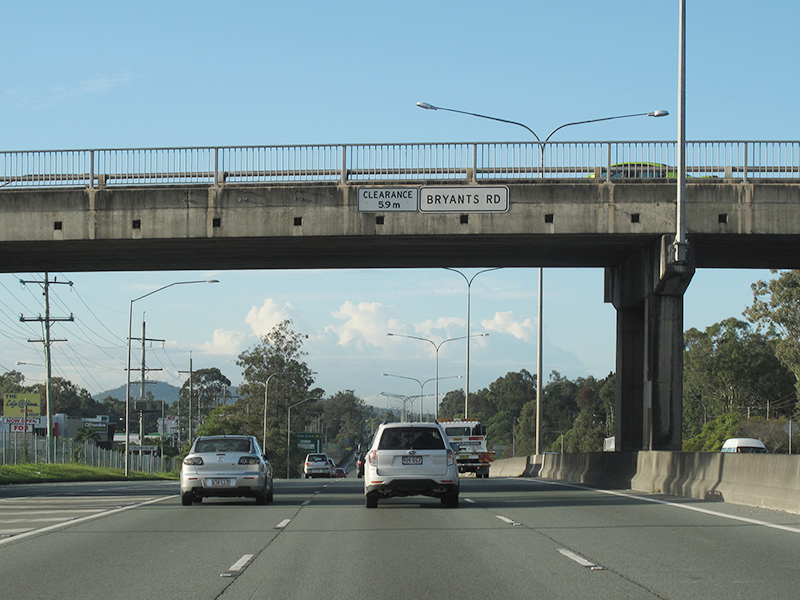
Advance Directional Sign: AD sign at Tanah Merah approaching Bryants Rd, February 2009. Image © Rob Tilley |
 |
Advance Directional Sign: AD sign on the Fitzgerald Av off ramp at Springwood, March 2009. Image © Rob Tilley |
|
 |
Advance Directional Sign: AD sign at Tanah Merah approaching Bryants Rd, February 2009. Image © Rob Tilley |
 |
Advance Directional Sign: AD sign at Springwood approaching Chatswood Rd and Watland St interchanges, February 2015. Image © Rob Tilley |
|
 |
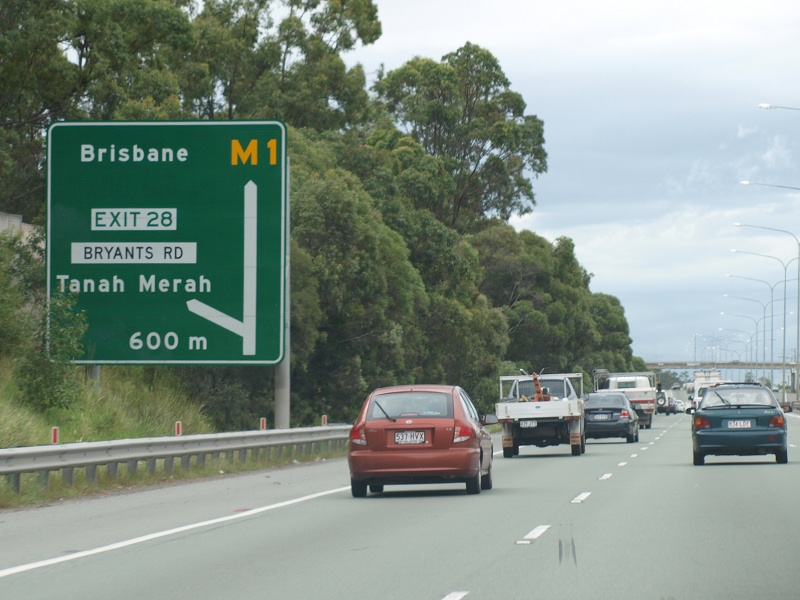
intersection Directional Sign: ID sign at the interchange with Bryants Rd, Tanah Merah, July 2018. Click here for a photo of this location by Rob Tilley from February 2009. Image © Rob Tilley |
 |
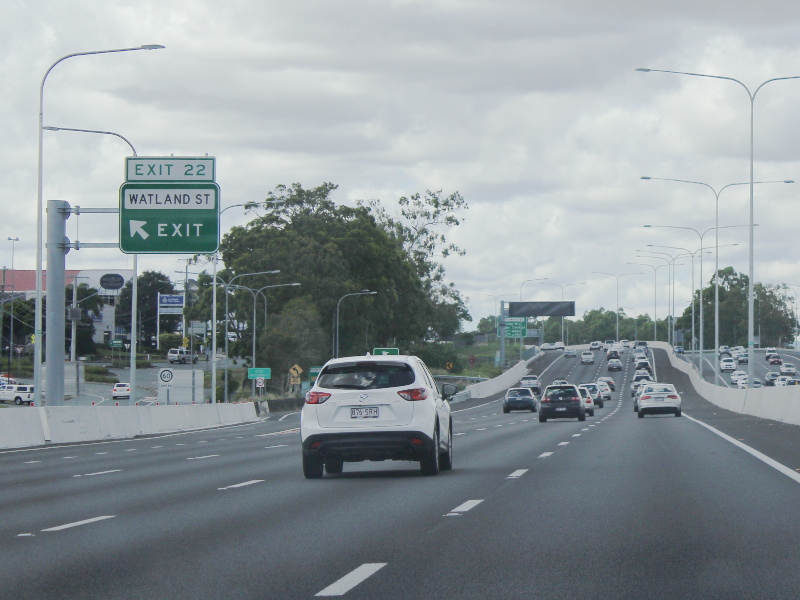
Advance Directional Sign: AD sign approaching Watland St interchange, Springwood, February 2015. Click here for a photo by Rob Tilley from March 2009. Image © Rob Tilley |
|
 |
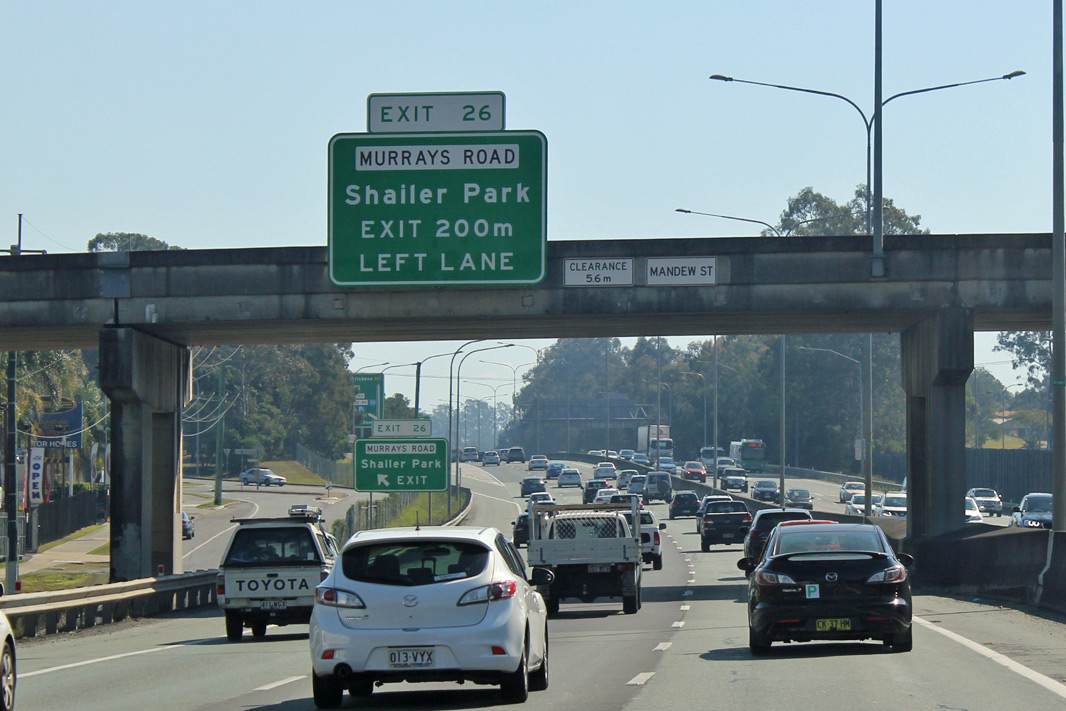
Advance Directional Sign: AD sign at Tanah Merah for the Murrays Rd interchange, July 2018. Click here for a photo of this location by Rob Tilley from February 2009. Image © Rob Tilley |
 |
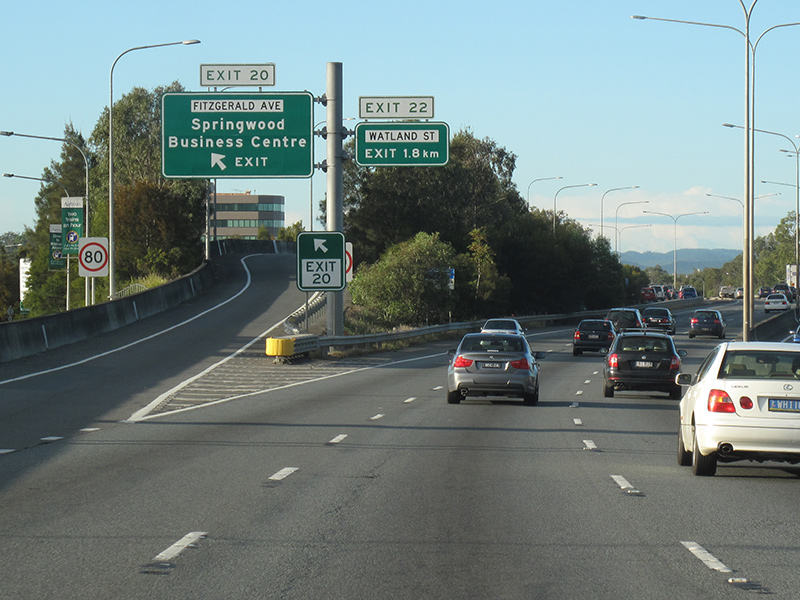
Advance Directional Sign: AD sign on the Fitzgerald Av off ramp at Springwood, March 2009. Image © Rob Tilley |
|
 |
Advance Directional Sign: AD sign on the Mandew St overpass at Tanah Merah for the Murrays Rd interchange, July 2018. Click here for a photo of this location by Rob Tilley from February 2009. Image © Rob Tilley |
 |
Watland Street Interchange: Pacific Mwy (M1) at the Watland St interchange at Springwood, February 2015. Click here for a photo by Rob Tilley from March 2009. Image © Rob Tilley |
|
 |
Murrays Road Interchange: Pacific Mwy (M1) at the Murrays Rd interchange at Slacks Creek, July 2018. Click here for a photo of this location by Rob Tilley from February 2009. Image © Rob Tilley |
 |
Advance Directional Sign: AD sign at Springwood for Chatswood Rd interchange, March 2006. Image © Paul Rands |
|
 |
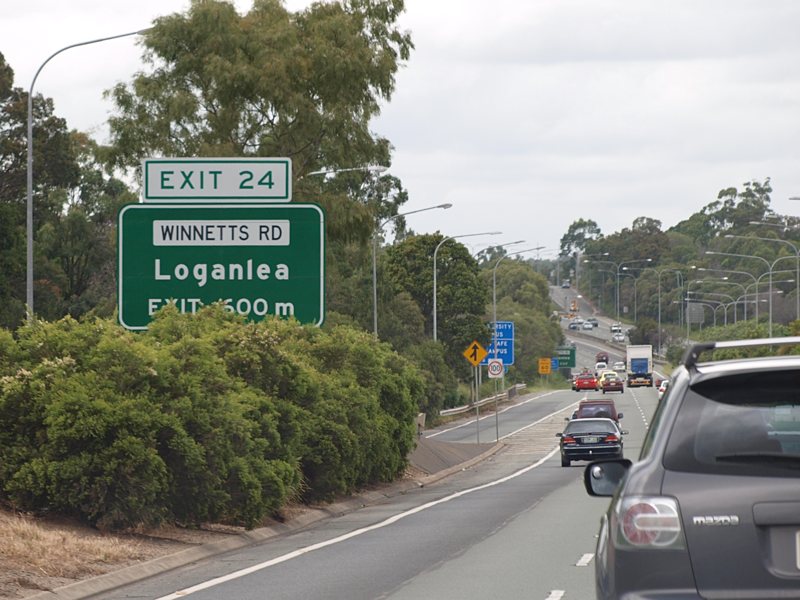
Advance Directional Sign: AD sign at Slacks Creek approaching Loganlea Rd, July 2018. Image © Rob Tilley |
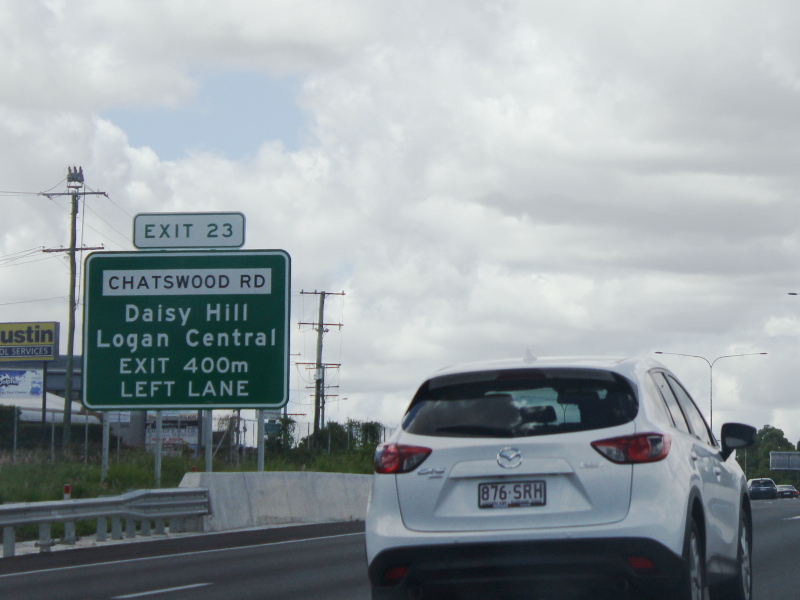 |
Advance Directional Sign: AD sign at Daisy Hill for Chatswood Rd interchange, February 2015. Click here for a photo by Rob Tilley from March 2009. Image © Rob Tilley |
|
 |
Advance Directional Sign: AD sign at Slacks Creek approaching Loganlea Rd, July 2018. Image © Rob Tilley |
 |
Chatswood Road Interchange: Pacific Mwy (M1) at the Chatswood Rd interchange at Daisy Hill, February 2015. Click here for a photo by Rob Tilley from March 2009. Image © Rob Tilley |
|
 |
Supplemental Advance Directional Sign: Supplemental AD sign at Slacks Creek approaching Loganlea Rd, July 2018. Image © Rob Tilley |
 |
Advance Directional Sign: AD sign at Daisy Hill approaching Winnetts Rd interchange, February 2015. Click here for a photo by Rob Tilley from March 2009. Image © Rob Tilley |
|
 |
Reassurance Directional Sign: Distance sign at Slacks Ck, July 2018. Image © Rob Tilley |
 |
Supplemental Advance Directional Sign: Supplemental AD sign at Daisy Hill approaching Winnetts Rd interchange, March 2006. Image © Paul Rands |
|
 |
Advance Directional Sign: AD sign at Slacks Creek approaching Logan Rd (SR30), February 2009. Image © Rob Tilley |
 |
Winnetts Road Interchange: Pacific Mwy (M1) at the Winnetts Rd interchange at Daisy Hill, February 2015. Click here for a photo by Rob Tilley from March 2009. Image © Rob Tilley |
|
 |
Advance Directional Sign: AD sign at Slacks Creek approaching Logan Rd (SR30), February 2009. Image © Rob Tilley |
 |
Advance Directional Sign: AD sign at Daisy Hill for the Bryants Rd interchange, February 2015. Click here for a photo by Paul Rands from March 2006. Image © Rob Tilley |
|
 |
Logan Road Interchange: Pacific Mwy (M1) at the Logan Rd (SR30) interchange at Slacks Creek, February 2009. Image © Rob Tilley |
 |
Freeway Green Advance Directional Sign: Freeway green AD sign at Shailer Park approaching Bryants Rd, February 2015. Click here for a photo by Paul Rands from March 2006. Image © Rob Tilley |
|
 |
Caption Title: Caption, July 2018. Image © Rob Tilley |
 |
Supplemental Freeway Green Advance Directional Sign: Supplemental freeway green AD sign at Shailer Park approaching Bryants Rd, May 2005. Image © Rob Tilley |
|
 |
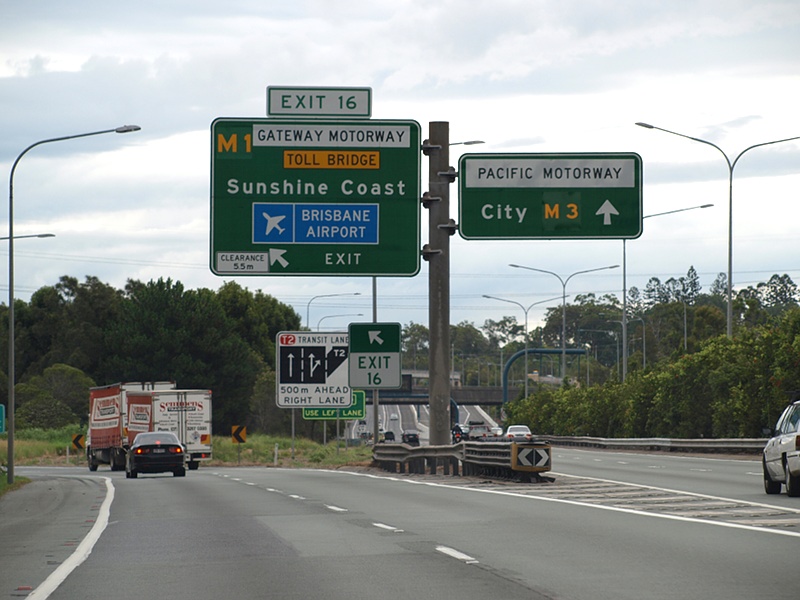
Advance Directional Sign: AD sign approaching Gateway Mwy (M1) and Pacific Mwy (M3) at Underwood, July 2018. Click here for a photo of this location by Rob Tilley from February 2009. Image © Rob Tilley |
 |
Intersection Directional Sign: ID sign at the Bryants Rd interchange at Shailer Park, November 2010. Click here for a photo of this location by Paul Rands from March 2006. Image © Rob Tilley |
|
 |
Advance Directional Sign: AD sign approaching Gateway Mwy (M1) and Pacific Mwy (M3) at Underwood, July 2018. Click here for a photo of this location by Rob Tilley from February 2009. Image © Rob Tilley |
 |
Bryants Road: Pacific Mwy (M1) as it passes under Bryants Rd at Shailer Park, June 2012. Image © Justin Cozart |
|
 |
Supplemental Advance Directional Sign: Supplemental AD sign approaching Gateway Mwy (M1) and Pacific Mwy (M3) at Underwood, July 2018, July 2018. Image © Rob Tilley |
 |
Advance Directional Sign: AD sign at Loganholme approaching Beenleigh-Redland Bay Rd (SR47), March 2006. Image © Paul Rands |
|
 |
Welcome to Brisbane: Sign welcoming visitors to Brisbane at Eight Mile Plains, July 2018. Image © Rob Tilley |
 |
Advance Directional Sign: AD sign at Loganholme approaching Beenleigh-Redland Bay Rd (SR47), February 2015. Click here for a photo by Rob Tilley from March 2009. Image © Rob Tilley |
|
 |
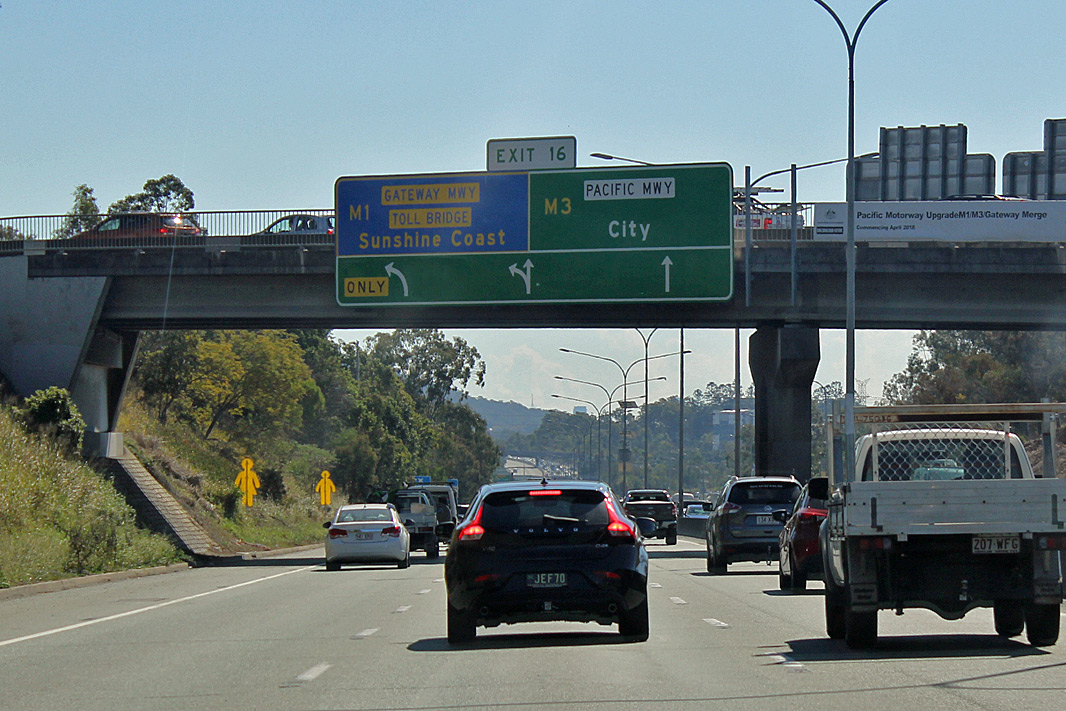
Gateway Motorway & Pacific Motorway Interchange: Pacific Mwy becomes M3 here at Eight Mile Plains, and M1 continues as Gateway Motorway bypassing Brisbane city to the east., February 2009. The Pacific Mwy name is on a coverplate over South Eastern Fwy. Image © Rob Tilley |
 |
Supplemental Advance Directional Sign: Supplemental AD sign at Loganholme approaching Beenleigh-Redland Bay Rd (SR47), February 2015. Click here for a photo by Justin Cozart from June 2012. Image © Rob Tilley |
|
 |
Beenleigh Road-Redland Bay Interchange: Pacific Mwy (M1) at the interchange with Beenleigh-Redland Bay Rd (SR47), June 2012. Image © Justin Cozart |
|||
 |
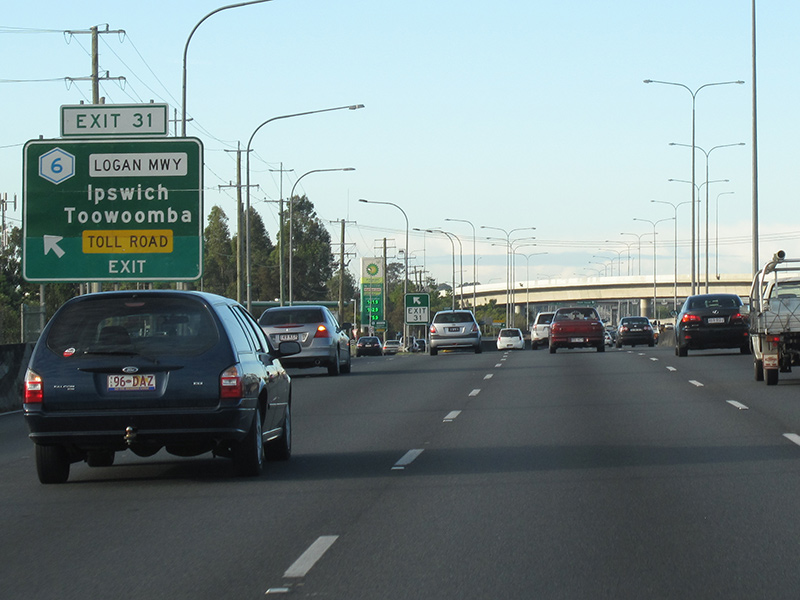
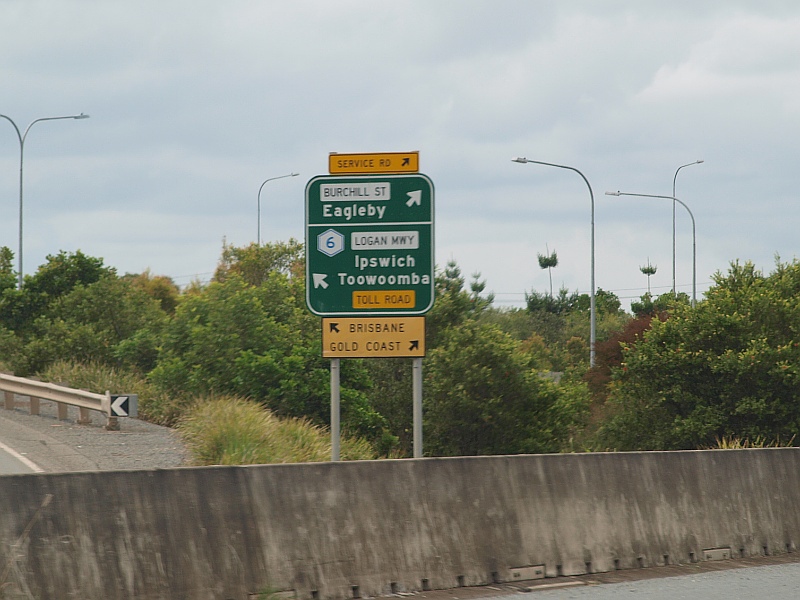
Freeway Green Advance Directional Sign: Freeway green AD sign at Loganholme approaching Logan Mwy (Metroad 6) interchange, March 2009. Image © Rob Tilley |
|||
 |
Advance Directional Sign: AD sign at Loganholme approaching Logan Mwy (Metroad 6) interchange, March 2006. Image © Paul Rands |
|||
 |
Advance Directional Sign: AD sign at Loganholme approaching Logan Mwy (Metroad 6) interchange, March 2006. Image © Paul Rands |
|||
 |
Logan Motorway Interchange: Pacific Mwy (M1) at the Logan Mwy (Metroad 6) interchange at Loganholme, June 2012. Image © Justin Cozart |
|||
 |
Advance Directional Sign: AD sign on the off ramp to Logan Mwy (Metroad 6) at Loganholme, March 2009. Image © Rob Tilley |
|||
 |
Advance Directional Sign: AD sign at Loganholme within the Logan Mwy (Metroad 6) interchange for City Rd (SR92), March 2006. Image © Paul Rands |
|||
 |
Supplemental Advance Directional Sign: Supplemental AD sign at Loganholme for City Rd (SR92) interchange , March 2006. Image © Paul Rands |
|||
 |
Exit Distance Sign: Reassurance directional sign for exits, Loganholme, March 2006. Image © Paul Rands |
|||
| Click here for the continuation of M1 as Gateway Motorway Click here for the continuation of Pacific Motorway as M3 Click here for the continuation of Pacific Motorway (M1) between Gaven and Loganholme |
||||
1 Department of Transport and Main Roads, The State Road Network of Queensland, 30 June 2010
2 Logan District History
3 Bulldust, Beef & Beyond
4 Tyler Bullock
5 Building Brisbane's History: Structure, Sculptures, Stories and Secrets. ISBN 9781921606199
6 Brisbane Times, South-East Queensland transport infrastructure rollout since 1975, 6 July 2010
7 Department of Main Roads Annual Report 1995-1996
8 The Pacific Motorway Report: An investigation into the actions of the Department of Main Roads in relation to noise and safety issues concerning the Pacific Motorway. ISBN 978-0-9758442-9-8.
9 Department of Transport and Main Roads, Pacific Motorway (M1) upgrade: Springwood (south) to Daisy Hill
10 Department of Transport and Main Roads, Construction Update, Pacific Motorway Upgrade Project, Springwood (south) to Daisy Hill, May 2010.
11 Department of Transport and Main Roads, Media Release, Pacific Motorway Upgrade Start of construction works Pacific Motorway: Fitzgerald Avenue to Shortland Street, April 2013
Last updated: 08-Jul-2020 13:34
This site © Paul Rands. All rights reserved. Some portions © (copyright) by their respective and credited owners. Permission must be obtained before using any images from this site. For details, please email by clicking here.