|
|
|
|
|
 |
Pacific Highway, Gore Hill Freeway, Warringah Freeway, Sydney Harbour Tunnel, Cahill Expressway, Eastern Distributor, Southern Cross Drive, General Holmes Drive, The Grand Parade, President Avenue & Princes Highway (Metroad 1) - Hornsby to Artarmon (Decommissioned) |
Route Numbering:

General Information:
Metroad 1 is basically a replacement of National Route 1 through the Sydney area, when Metroads were introduced to NSW in the 1990s. That said, the Metroad 1 route has had some changes to its routing since it was introduced.
The route is formed by several major roads in Sydney and carries large volumes of traffic daily. It consists of mostly suburban arterial road qualities, mostly 3 lanes in each direction. There are a few near freeway standard sections along the route.
Multiplexes along the route include:
History:
| Hornsby to Artarmon: | Artarmon to Hornsby: | |||
| Preview: | Description: | Preview: | Description: | |
 |
AD Sign: Southbound advance directional sign on the Pacific Hwy / Sydney-Newcastle Fwy (NH1) interchange at Wahroonga. November 2010. Click here for a photo of the same location from March 2007. Image © Rob Tilley |
 |
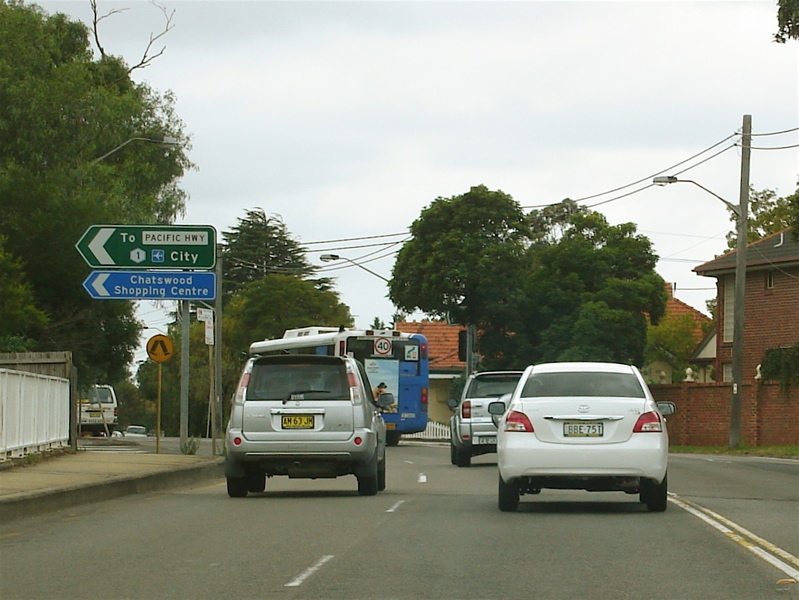
Intersection Directional Sign: ID sign at the Mowbray Rd junction on Chatswood, November 2010. Image © Rob Tilley |
|
 |
ID Sign: Southbound intersection directional sign on the Pacific Hwy / Sydney-Newcastle Fwy (NH1) interchange at Wahroonga. November 2010. Click here for a photo of the same location from March 2007. Image © Rob Tilley |
 |
Northbound at Chatswood: Looking north on the Pacific Hwy near Fullers Rd with the Chatswood CBD dominating the skyline, March 2007. Image © Paul Rands |
|
 |
Distance Sign: Southbound RD sign located just after the Sydney-Newcastle Fwy interchange at Wahroonga. November 2010. Click here for a photo of the same location from March 2007. Image © Rob Tilley |
 |
AD signage: Advance directional sign over Pacific Highway approaching the Fullers Road intersection at Chatswood, March 2007. Image © Paul Rands |
|
 |
Entering Warrawee: Pacific Hwy (Metroad 1) as it enters the suburb at Warrawee, November 2010. Image © Rob Tilley |
 |
AD signage: Advance directional sign over Mowbray Road approaching the Pacific Highway intersection at Chatswood, March 2007. Image © Paul Rands |
|
 |
Fox Valley Road Approach: Southbound at Warrawee approaching the intersection with Fox Valley Road. November 2010. Click here for a photo of the same location from March 2007. Image © Rob Tilley |
 |
Metroad 1 Signage: Looking eastbound on Mowbray Road in Chatswood, March 2007. Image © Paul Rands |
|
 |
Turramurra: Southbound approaching Ray Street, March 2007. Image © Paul Rands |
 |
Northbound at Chatswood: Looking toward Boundary Road from Wyvern Street in Chatswood, March 2007. Image © Paul Rands |
|
 |
Intersection Directional Sign: ID sign assembly at Rohini Av in Turramurra, November 2010. Image © Rob Tilley |
 |
Distance Sign: Southbound RD sign located at Roseville, March 2007. Image © Paul Rands |
|
 |
Advance Directional Sign: Southbound AD sign approaching Bobbin Head Road, November 2010. Click here for a photo of the same location from March 2007 Image © Rob Tilley |
Lindfield CBD: Main shopping precinct of Lindfield, near the junction with Beaconsfield Parade, March 2007. Image © Paul Rands |
||
 |
Bobbin Head Road: Pacific Hwy (Metroad 1) at Bobbin Head Rd, Turramurra, November 2010. Image © Rob Tilley |
 |
Signalised Pedestrian Crossing: Northbound outside Lindfield Railway Station. The original signals were installed here in 1949, but have since been updated. Note the short posts and small finial caps on top of some of the signals, these probably date from either the original installation or a subsquent setup from the 50s or 60s, March 2007. Image © Paul Rands |
|
 |
Reassurance Marker: Southbound sign with route number to provide navigational guidance. Turramurra, March 2007. Image © Paul Rands |
 |
Northbound at Lindfield: Metroad 1 as it heads northwards through the suburb of Lindfield, March 2007. Image © Paul Rands |
|
 |
Pymble: Heading southbound at Pymble near Livingstone Av, March 2007. Image © Paul Rands |
 |
Typical Conditions: The average road quality of Metroad 1 through Gordon. Northbound at Bushland Avenue, March 2007. Image © Paul Rands |
|
 |
Advance Directional Sign: Southbound at Pymble approaching Ryde Road and Mona Vale Road (Metroad 3), November 2010. Image © Rob Tilley |
 |
Advance Directional Sign: Northbound AD sign at Gordon approaching Metroad 3, March 2007. Image © Paul Rands |
|
.jpg) |
Mona Vale / Ryde Road Approach: Southbound signage and road conditions approaching the interchange with Metroad 3 at Pymble, March 2007. Image © Paul Rands |
.jpg) |
Mona Vale / Ryde Road Approach: Northbound signage and road conditions approaching the interchange with Metroad 3 at Gordon, March 2007. Image © Paul Rands |
|
 |
Mona Vale Road & Ryde Road: Intersection directional sign at Mona Vale Rd (Metroad 3) and Ryde Rd (Metroad 3) at Pymble, November 2010. Image © Rob Tilley |
 |
Mona Vale Road & Ryde Road: Intersection directional sign at Mona Vale Rd (Metroad 3) and Ryde Rd (Metroad 3) at Pymble, November 2010. Image © Rob Tilley |
|
 |
Mona Vale Road & Ryde Road: Intersection directional sign at Mona Vale Rd (Metroad 3) and Ryde Rd (Metroad 3) at Pymble, November 2010. Image © Rob Tilley |
 |
Ryde Road / Mona Vale Road / Pacific Highway Interchange: Aerial view of the construction of the Ryde Road, Mona Vale and Pacific Highway interchange at Gordon, 1988. Image © DMR, supplied by Tiptruck |
|
 |
Advance Directional Sign: AD sign approaching Boundary St (SR29) at Chatswood, November 2010. Image © Rob Tilley |
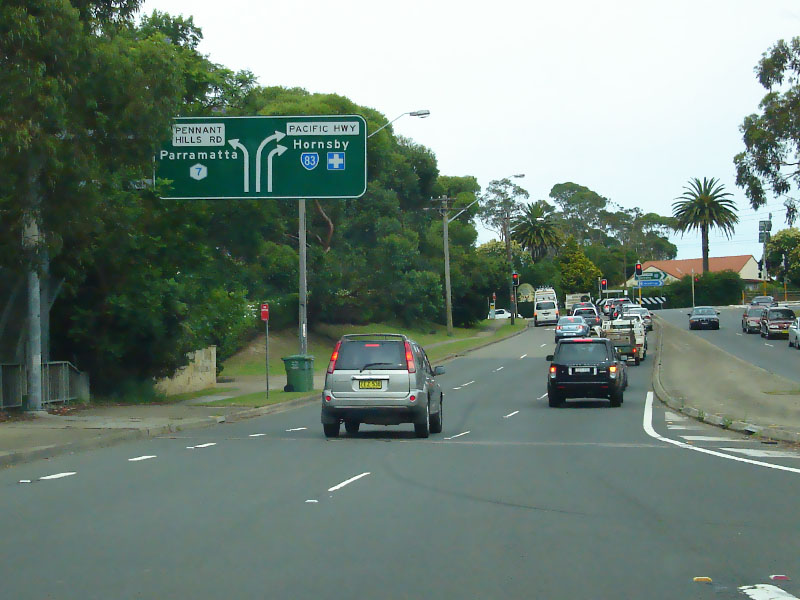 |
Pacific Highway / Sydney-Newcastle Freeway / Pennant Hills Road Intersection: Northern terminus of Metroad 1: Sydney-Newcastle Fwy (NH1) and Pennant Hills Rd (Metroad 7) at Hornsby, December 2008. Image © Paul Rands |
|
 |
Intersection Directional Sign: ID sign assembly at Boundary Rd, Chatswood, November 2010. The SR29 duplex begins at this junction. Image © Rob Tilley |
|||
 |
Distance Sign: RD sign at Chatswood, after Boundary Rd (SR29), November 2010. Image © Rob Tilley |
|||
 |
Lane Allocation Sign & Variable Message Sign: Lane allocation and VMS signs at Chatswood approaching Fullers Rd (SR29), November 2010. Image © Rob Tilley |
|||
 |
Advance Directional Sign: AD sign approaching Fullers Rd (SR29) at Chatswood, November 2010. Image © Rob Tilley |
|||
 |
Fullers Road: ID sign assembly at Fullers Rd (SR29), Chatswood, November 2010. The SR29 duplex ends at this junction. Image © Rob Tilley |
|||
 |
Advance Directional Sign: AD sign approaching Nelson St, which is the access route for southbound traffic entering Mowbray Rd, westbound, November 2010. Image © Rob Tilley |
|||
 |
Nelson Street: Pacific Hwy (Metroad 1) at Nelson St in Chatswood, November 2010. Image © Rob Tilley |
|||
 |
Intersection Directional Sign: ID sign at the Mowbray Rd junction on Chatswood, November 2010. Image © Rob Tilley |
|||
| Click here for the continuation of Metroad 1 between Artarmon and Kyeemagh | ||||
1 Roads & Traffic Authority
Last updated: 03 Dec 2019 19:30
This site © Paul Rands. All rights reserved. Some portions © (copyright) by their respective and credited owners. Permission must be obtained before using any images from this site. For details, please email by clicking here.