|
|
|
|
|
 |
Rochdale Road, Stephenson Avenue, Underwood Avenue, Hay Street, Thomas Street, Roberts Road, Wellington Street & Plain Street (State Route 65) |
Statistics:
Route Numbering:
General Information:
State Route 65 is an east-west running route, connecting Perth's beachside suburbs with the CBD. Part of the route is split with Hay Street between Thomas Street, West Perth to Railway Road, Subiaco for westbound traffic, and Roberts Road between Railway Road, Subiaco and Thomas Street, West Perth.
The route passes through some of Perth's older suburbs.
History:
Hay Street was named aftet Robert William Hay, Permanent Under Secretary for the Colonies. Until 1897, sections were also called Howick Street (after Earl Grey, Viscount Howick) and Twiss Street (after Horace Twiss, Under Secretary of the State, who was actively interested in the formation of the Swan River Colony. 1
In 1916, following World War I, Mueller Road Subiaco, renamed to Roberts Road. It was named after Lieutenant Colonel Roberts, a Subiaco councillor who had left on active service early in the war and was re-elected to the council unopposed. (Sir Von Mueller was a botanist and Australian inland explorer). 1

| East Perth to City Beach | City Beach to East Perth | |||
| Preview: | Description: | Preview: | Description: | |
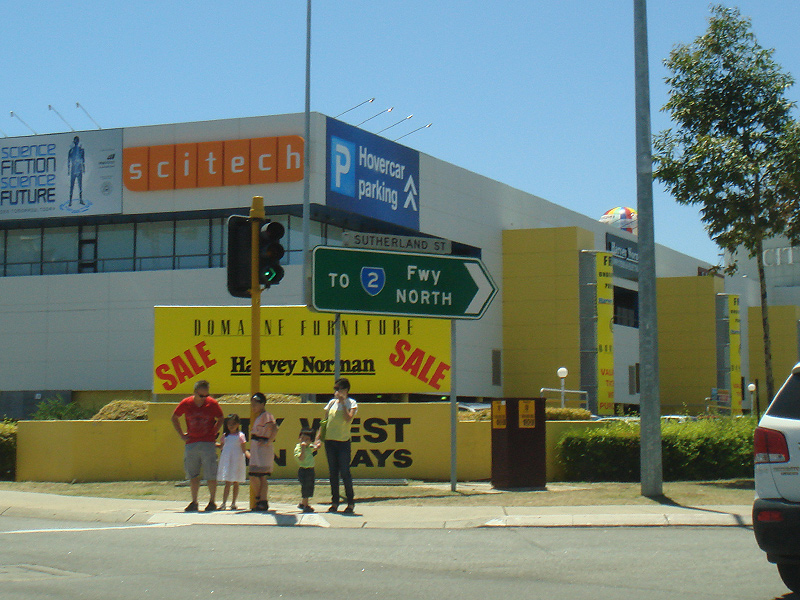 |
Intersection Directional Sign: ID sign on the corner of Wellington St (SR65) and Sutherland St, West Perth, December 2012. Image © Paul Rands |
 |
Intersection Directional Sign: ID sign assembly at the corner of West Coast Hwy (SR71 / TD204) and Rochdale Rd (SR65) at City Beach, June 2009. Image © Paul Rands |
|
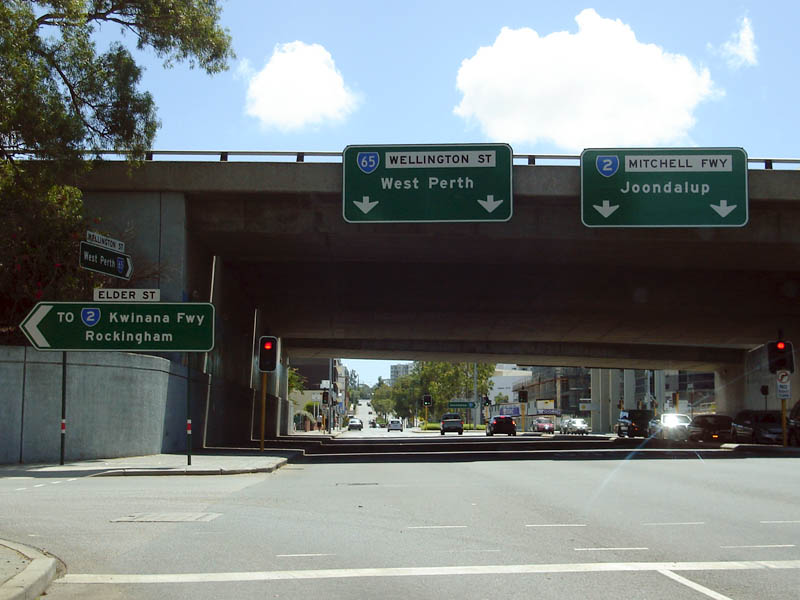 |
Elder Street & Mitchell Freeway
Interchange: Looking northwest on Wellington Street in Perth at the corner of Elder Street and also with the ramps to the Mitchell Freeway (SR2). February 2008. Image © Paul Rands |
 |
Approaching
Stephenson Avenue: Rochdale Rd (SR65) approaching the unnumbered section of Rochdale Rd and Stephenson Av (SR65) at City Beach, June 2009. Image © Paul Rands |
|
 |
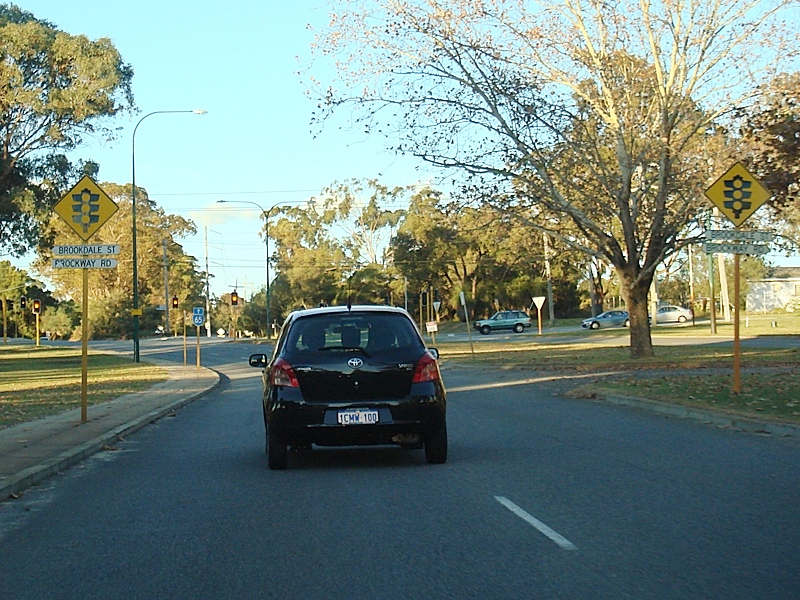
Approaching Brockway
Road & Brookdale Street: Underwood Av (SR65) at Shenton Park approaching Brockway Rd and Brookdale St, June 2009. Image © Paul Rands |
 |
Trailblazer: Trailblazer on Rochdale Rd (SR65) approaching the unnumbered section of Rochdale Rd and Stephenson Av (SR65) at City Beach, June 2009. Image © Paul Rands |
|
 |
Trailblazer: Trailblazer on Underwood Av (SR65) at Shenton Park approaching Brockway Rd and Brookdale St, June 2009. Image © Paul Rands |
 |
Stephenson
Avenue: Rochdale Rd (SR65) approaching the unnumbered section of Rochdale Rd and Stephenson Av (SR65) at City Beach, June 2009. Image © Paul Rands |
|
 |
Brockway Road &
Brookdale Street: Underwood Av (SR65) at Shenton Park at the junction with Brockway Rd and Brookdale St, June 2009. Image © Paul Rands |
 |
Trailblazer: Trailblazer on Stephenson Av (SR65) at City Beach after Rochdale Rd (SR65) and the unnumbered section of Rochdale Rd, June 2009. Image © Paul Rands |
|
 |
Meagher
Drive: Corner of Underwood Av (SR65) and Meagher Dr at Floreat, June 2009. Image © Paul Rands |
 |
Meagher
Drive: Corner of Underwood Av (SR65) and Meagher Dr at Floreat, June 2009. Image © Paul Rands |
|
 |
Approaching Rochdale
Road: Stephenson Av (SR65) at Mt Claremont approaching Rochdale Rd, June 2009. SR65 turns right at this junction. Image © Paul Rands |
 |
Approaching Brockway
Road & Brookdale Street: Underwood Av (SR65) at Floreat approaching Brockway Rd and Brookdale St, June 2009. Image © Paul Rands |
|
 |
Rochdale
Road: Stephenson Av (SR65) at Mt Claremont at the junction Rochdale Rd, June 2009. SR65 turns right at this junction. Image © Paul Rands |
 |
Trailblazer: Trailblazer on Underwood Av (SR65) at Floreat approaching Brockway Rd and Brookdale St, June 2009. Image © Paul Rands |
|
 |
Approaching Selby
Street: Underwood Av (SR65) at Floreat approaching Selby St (SR64), June 2009. Image © Paul Rands |
|||
 |
Trailblazer
Assembly: Trailblazer assembly at Floreat approaching Selby St (SR64), June 2009. Image © Paul Rands |
|||
 |
Approaching Jersey
Street: Hay St (SR65) approaching Jersey St in Jolimont, June 2009. Image © Paul Rands |
|||
 |
Advance Directional
Sign: AD sign on Hay St (SR65) in Subiaco, approaching Roberts Rd (SR65) and Railway Rd, June 2009. Image © Paul Rands |
|||
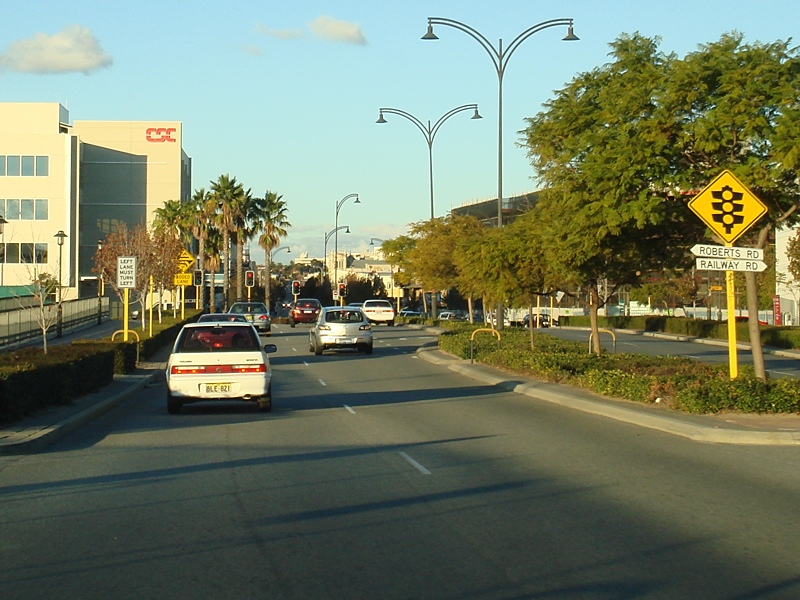 |
Roberts Road &
Railway Road: Hay St (SR65) in Subiaco at the junction with Roberst Rd (SR65) and Railway Rd, June 2009. Image © Paul Rands |
|||
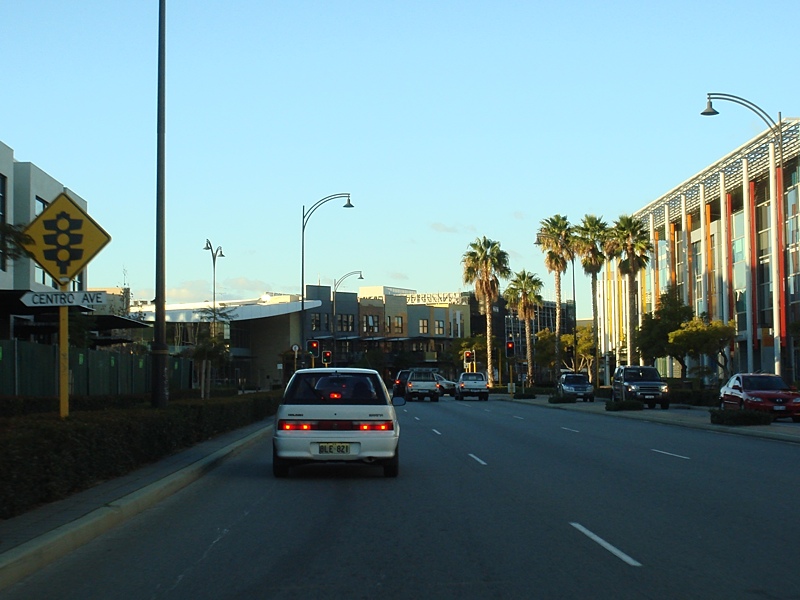 |
Approaching Centro
Avenue: Roberts Rd (SR65) at Subiaco approaching Centro Av, June 2009. Image © Paul Rands |
|||
 |
Approaching Station
Street: Roberts Rd (SR65) at Subiaco approaching Station St, June 2009. Image © Paul Rands |
|||
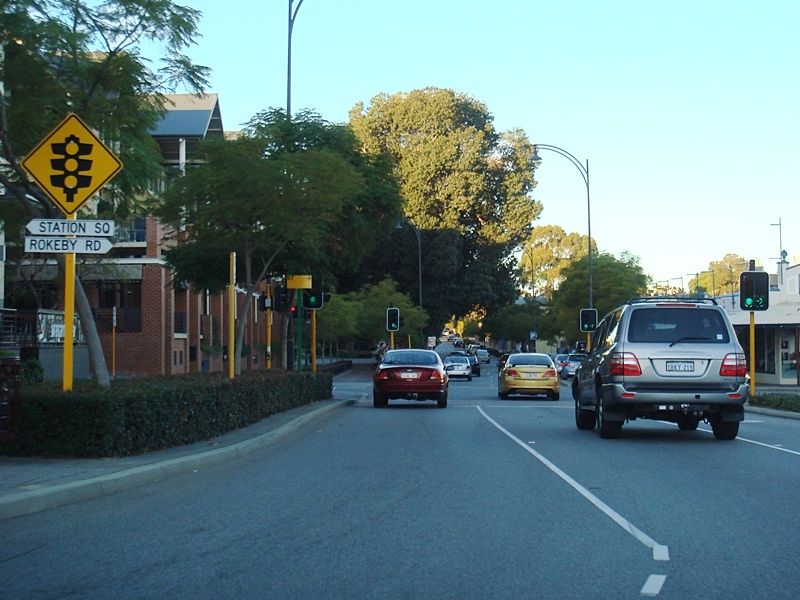 |
Approaching Station
Square & Rokeby Road: Roberts Rd (SR65) at Subiaco approaching Station Sq and Rokeby Rd, June 2009. Image © Paul Rands |
|||
 |
Approaching
Townshend Rd & Hadyn Bunton Cr: Roberts Rd (SR65) at Subiaco approaching Townshend Rd & Hadyn Bunton Cr, June 2009. Image © Paul Rands |
|||
 |
Trailblazer: SR65 trailblazer on Roberts Rd (SR65) at the intersection with Hadyn Bunton Cr and Townshend Rd in Subiaco, June 2009. Note Subiaco Oval in the distance. Image © Paul Rands |
|||
 |
Advance Directional
Sign: AD sign on Roberts Rd (SR65) at Subiaco, approaching Thomas St (SR61) and Wellington St (SR65), June 2009. Image © Paul Rands |
|||
 |
Thomas
Street: Corner of Roberts Rd (SR65), Wellington St (SR65) and Thomas St (SR61), June 2009. Image © Paul Rands |
|||
 |
Trailblazer: SR65 trailblazer in West Perth, November 2012. Image © Paul Rands |
|||
 |
Approaching Colin
Street: Wellington St (SR65) at West Perth approaching Colin St, June 2009. Image © Paul Rands |
|||
 |
Approaching
Sutherland St: Wellington St (SR65) in West Perth approaching Sutherland St, June 2009. Image © Paul Rands |
|||
 |
Sutherland Street: Corner of Wellington St (SR65) and Sutherland St in West Perth, November 2012. Image © Paul Rands |
|||
 |
Mitchell
Freeway: Wellington St (SR65) at the Mitchell Fwy (SR2) interchange at West Perth, November 2012. Image © Paul Rands |
|||
 |
Intersection Directional Sign: ID sign at the interchange of Wellington St (SR65) and Mitchell Fwy (SR2) at West Perth, November 2012. Image © Paul Rands |
|||
 |
Trailblazer: SR65 trailblazer on Wellington St in Perth, June 2009. Image © Paul Rands |
|||
 |
Approaching William
Street: Wellington St (SR65) approaching William St (SR53) in Perth CBD, June 2009. Image © Paul Rands |
|||
 |
William
Street: Wellington St (SR65) at the junction with William St (SR53 North) in Perth CBD, June 2009. Image © Paul Rands |
|||
 |
Approaching Barrack
Street: Wellington St (SR65) in Perth CBD approaching Barrack St (SR53 South), June 2009. Image © Paul Rands |
|||
 |
Approaching Pier
Street: Wellington St (SR65) in Perth CBD approaching Pier St, June 2009. Image © Paul Rands |
|||
 |
Approaching Lord
Street: Wellington St (SR65) in Perth CBD, approaching Lord St (SR51) and Victoria Av, June 2009. Image © Paul Rands |
|||
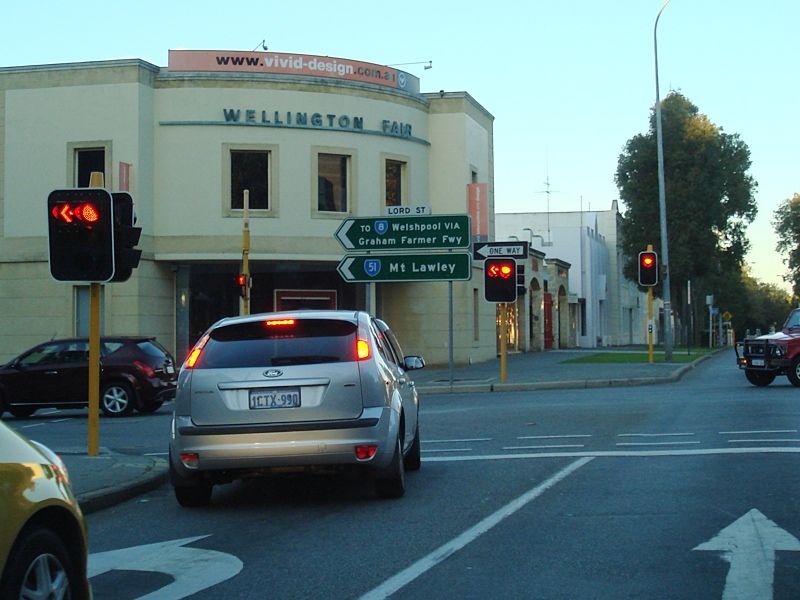 |
Lord Street &
Victoria Avenue: Intersection directional sign assembly at the corner of Wellington St (SR65) in Perth CBD, Lord St (SR51) and Victoria Av, June 2009. Image © Paul Rands |
|||
 |
Trailblazer: SR65 trailblazer in East Perth after the Lord St (SR51 North) and Victoria Av junction, June 2009. Image © Paul Rands |
|||
 |
Approaching Hill
Street: Wellington St (SR65) in East Perth approaching Hill St (SR51 South), June 2009. Image © Paul Rands |
|||
 |
Plain
Street: Corner of Wellington St (SR65 and unnumbered segment) at the junction with Plain St in East Perth, June 2009. SR65 turns right at this intersection. Image © Paul Rands |
|||
 |
Adelaide
Terrace: Plain St (SR65) at the junction with Adelaide Tce in East Perth, June 2009. Image © Paul Rands |
|||
 |
Trailblazer: SR65 trailblazer in Plain Street in East Perth, June 2009. Image © Paul Rands |
|||
 |
Approaching
Riverside Drive: Plain St (SR65) at East Perth approaching Riverside Dr (SR5), June 2009. Image © Paul Rands |
|||
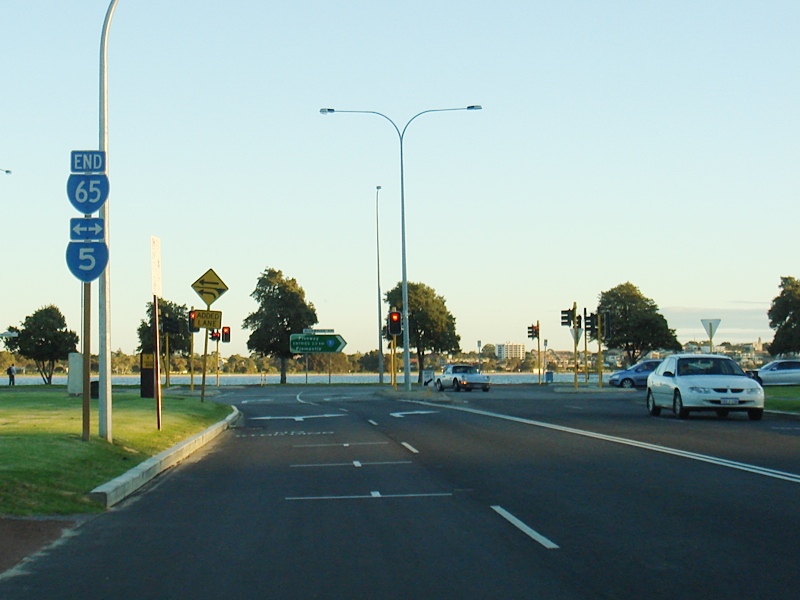 |
End State Route
65: Plain Street (SR65) at East Perth at Riverside Drive (SR5), June 2009. Image © Paul Rands |
|||
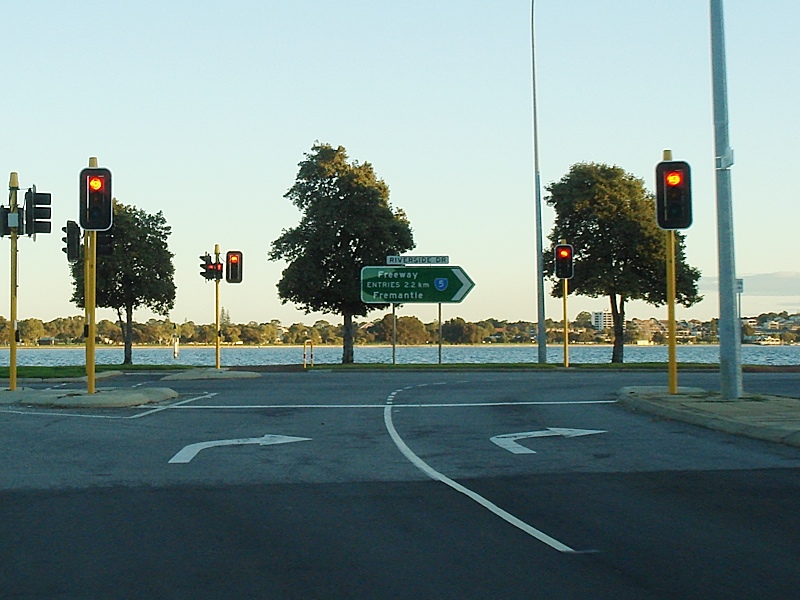 |
Riverside
Drive: Plain Street (SR65) at East Perth at Riverside Drive (SR5), June 2009. Image © Paul Rands |
|||
1 City of Subiaco
Last updated: 22:50:23 10/8/2014 .
This site © Paul Rands. All rights reserved. Some portions © (copyright) by their respective and credited owners. Permission must be obtained before using any images from this site. For details, please email by clicking here.