|
|
|
|
|
| M1 A1 | Princes Highway, West Gate Freeway, CityLink, Monash Freeway & Princes Freeway (M1 / A1) - Nar Nar Goon to Drouin |
Statistics:
Route Numbering:
 1
1General Information:
M1 / A1 is a major route that crosses roughly from east to west in Victoria. The standard varies from single carriageway rural highway to full freeway standard.
Princes Freeway:
The Princes Freeway is in 2 sections. The western section connects with the West Gate Freeway and extends to the Geelong area. The eastern section connects with the Monash Freeway and joins up with the Princes Highway (East) at Traralgon. There is also a small section of Princes Freeway, otherwise known as Orbost Bypass, at Orbost. It's not dual carriageway however. 1
History:
Click here for photos of the former alignment between Nar Nar Goon and Drouin.
| Preview: | Description: |
 |
Advance Directional Sign: AD sign at Tynong approaching Tynong Rd and Tynong North Rd, January 2017. Image © Huang Milton Collection |
 |
Tynong Road Intersection: ID sign at the corner of Princes Fwy (M1) at Tynong Rd and Tynong North Rd in Tynong, September 2009. Image © Paul Rands |
 |
Tynong Road Intersection: ID sign at the corner of Princes Fwy (M1) at Tynong Rd and Tynong North Rd in Tynong, January 2017. Image © Huang Milton Collection |
 |
Advance Directional Sign: AD sign at Tynong approaching the turn off to Brew Road, January 2017. Image © Huang Milton Collection |
 |
Brew Road Junction: Princes Fwy (M1) at the junction with the access point to Brew Rd at Tynong, January 2017. Image © Huang Milton Collection |
 |
Advance Directional Sign: AD sign at Tynong approaching the turn off to Brew Road, January 2017. Image © Huang Milton Collection |
 |
Brew Road Junction: Black intersection directional sign on Princes Fwy (M1) at the junction with the access point to Brew Rd at Tynong, January 2017. Image © Huang Milton Collection |
 |
Advance Directional Sign: AD sign at Garfield North approaching Garfield North Road, January 2017. Image © Huang Milton Collection |
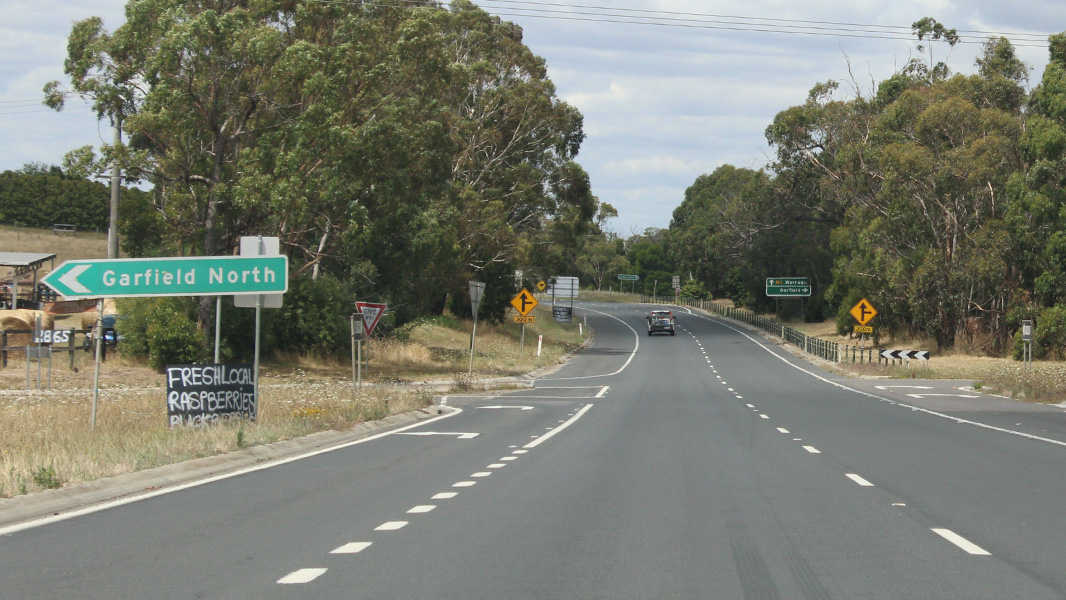 |
Garfield Road North Intersection: Corner of Princes Fwy and Garfield North Rd at Garfield North, January 2017. Image © Huang Milton Collection |
 |
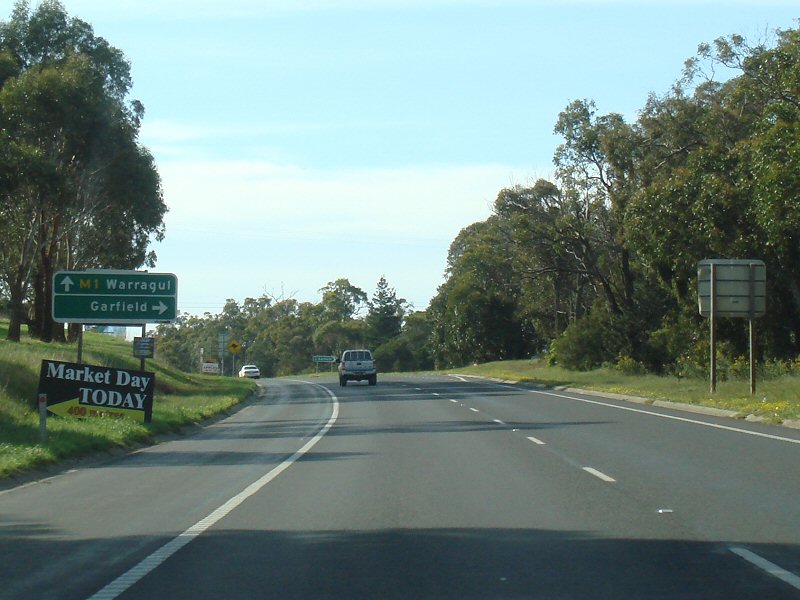
Advance Directional Sign: AD sign at Garfield North approaching Garfield Rd, January 2017. Click here for a photo by Paul Rands of this location from September 2009. Image © Huang Milton Collection |
 |
Garfield Road Intersection: Corner of Princes Fwy (M1) and Garfield Rd at Garfield North, January 2017. Image © Huang Milton Collection |
 |
Distance Sign: RD sign after the Garfield Rd junction at Garfield North, January 2017. Image © Huang Milton Collection |
 |
Martin Road Intersection: Corner of Princes Fwy (M1) and Martin Rd at Garfield North, January 2017. Image © Huang Milton Collection |
 |
Old princes Highway Intersection: Corner of Princes Fwy (M1) and Old Princes Hwy at Bunyip North, September 2009. Image © Paul Rands |
 |
Advance Directional Sign: AD sign at Bunyip North approaching Toninbuk Rd and Bunyip-Tonimbuk Rd, January 2017. Image © Huang Milton Collection |
 |
Tonimbuk Road & Bunyip Tonimbuk Road Intersection: ID sign at Bunyip North approaching Toninbuk Rd and Bunyip-Tonimbuk Rd, January 2017. Click here for a photo by Paul Rands of this location from September 2009. Image © Huang Milton Collection |
 |
Tonimbuk Road & Bunyip Tonimbuk Road Intersection: ID sign at Bunyip North approaching Toninbuk Rd and Bunyip-Tonimbuk Rd, September 2009. Image © Paul Rands |
 |
Distance Sign: RD sign at Bunyip North, after the Tonimbuk Road & Bunyip Tonimbuk Road Intersection, January 2017. Image © Huang Milton Collection |
 |
Services Sign: Sign indicating distance to the service centre, Princes Fwy (M1) at Bunyip North, September 2009. Image © Paul Rands |
 |
Advance Directional Sign: AD sign at Bunyip North approaching Wimpole Road and A'Beckett Road, January 2017. Image © Huang Milton Collection |
 |
Wimpole Road and A'Beckett Road Junction: ID sign at Bunyip North approaching Wimpole Road and A'Beckett Road, January 2017. Image © Huang Milton Collection |
 |
Services Sign: Sign indicating distance to the service centre, Princes Fwy (M1) at Bunyip North, September 2009. Image © Paul Rands |
 |
Services Sign: Sign indicating distance to the service centre, Princes Fwy (M1) at Longwarry North, January 2017. Click here for a photo by Paul Rands of this location from September 2009. Image © Huang Milton Collection |
 |
Service Centre Interchange: Princes Fwy (M1) at the interchange with the service centre, January 2017. Click here for a photo by Paul Rands of this location from September 2009. Image © Huang Milton Collection |
 |
Advance Directional Sign: AD sign on Princes Fwy (M1) at Longwarry North approaching the junction with Sand Rd and Koo Wee Rup-Longwarry Rd (C421), September 2009. Image © Paul Rands |
 |
Intersection Directional Sign: ID sign on Sand Road at Longwarry North, facing the exit from the service centre, September 2009. Image © Paul Rands |
 |
ID Sign: Intersection directional sign facing Sand Rd at the junction with Princes Fwy (M1) and Koo Wee Rup-Longwarry Rd (C421), September 2009. Image © Paul Rands |
 |
Distance Sign: RD sign on Princes Fwy (M1) at Longawarry North after the junction with Sand Rd and Koo Wee Rup-Longwarry Rd (C421), January 2017. Image © Huang Milton Collection |
 |
Advance Directional Sign: AD sign on Princes Fwy (M1) at Longwarry North for the interchange with Princes Hwy (C102) & Drouin-Warragul Rd (C426), September 2009. Image © Paul Rands |
 |
Supplemental Advance Directional Sign: Image © Huang Milton Collection |
 |
Supplemental Advance Directional Sign: Supplemental AD sign on Princes Fwy (M1) at Drouin West for the interchange with Princes Hwy (C102) & Drouin-Warragul Rd (C426), January 2017. Click here for a photo by Paul Rands of this location from September 2009. Image © Huang Milton Collection |
 |
Supplemental Advance Directional Sign: Supplemental AD sign on Princes Fwy (M1) at Drouin West for the interchange with Princes Hwy (C102) & Drouin-Warragul Rd (C426), January 2017. Image © Huang Milton Collection |
 |
Bypassed Town Sign: Bypassed town sign on Princes Fwy (M1) at Drouin West approaching the interchange with Princes Hwy (C102) & Drouin-Warragul Rd (C426), January 2017. Image © Huang Milton Collection |
 |
Princes Highway & Drouin-Warragul Road (Robin Hood) Interchange: Princes Fwy (M1) at Drouin West at the interchange with Princes Hwy (C102) & Drouin-Warragul Rd (C426), January 2017. Image © Huang Milton Collection |
 |
Robin Hood Interchange: Princes Fwy (M1) at Drouin West at the interchange with Princes Hwy (C102) & Drouin-Warragul Rd (C426), September 2009. Image © Paul Rands |
 |
Distance Sign: RD sign on Princes Fwy (M1) at Drouin West after the interchange with Princes Hwy (C102) & Drouin-Warragul Rd (C426), January 2017. Image © Huang Milton Collection |
 |
Main Neerim Road Overpass: Princes Fwy (M1) as it passes under Main Neerim Rd at Drouin, September 2009. Image © Paul Rands |
 |
Advance Directional Sign: AD sign on Princes Fwy (M1) at Drouin for the interchange with Drouin-Warragul Rd (C102), January 2017. Image © Huang Milton Collection |
|
Click here for the continuation of M1 between Drouin & Trafalgar |
|
1 Viseth Uch
2 Vicroads Road Management Plan, 30 October 2004
Last updated: 13-Feb-2019 18:47
This site © Paul Rands. All rights reserved. Some portions © (copyright) by their respective and credited owners. Permission must be obtained before using any images from this site. For details, please email by clicking here.