|
|
|
|
|
 |
Falcon Street, Military Road, Spit Road, Spit Bridge, Manly Road, Burnt Bridge Creek Deviation, Condamine Street & Pittwater Road (Metroad 10) - Dee Why to Neutral Bay (Decommissioned) |
Statistics:
Route Numbering:
General Information:
Metroad 10 is the major arterial road that links the Northern Beachside suburbs of Sydney to the North Sydney business precinct and eventually the Sydney CBD. The road is entirely multi-laned and divided for most of the route.
The current Spit Bridge comprises 7 spans of a total length of 745 feet 6 inches (227.28m), has 4 traffic lanes (44 feet or 13.41m wide) and a pedestrian walkway of 5 feet (1.5m) on either side.
There are three spans at either end of the opening span. Each of the six fixed spans have four welded plate girders as the main members, with cross girders, but without stringers or horizontal bracing. The concrete deck is dowelled to the steelwork. The opening span (Span 4) is a single-leaf bascule. It has two main girders, with cross girders and stringers, covered by an open mesh steel deck. Recent inspection shows that the steel mesh has had a coating of bitumen applied, some of which is wearing.
The two footways are of concrete on the fixed spans, and steel on the bascule span. The piers either side of the opening span are flanked by fenders, and when the bridge is in the open position a navigation channel of 80 feet wide (24.4m) is created. At the Mosman end the slab and two column piers rest on concrete piles driven into to the sands of the harbour bed at a depth of between 40 and 50 feet (12 - 15m). At the Manly end the harbour bottom slopes up steeply to outcropping rock on which the northern abutment sits. Piers 5 and 6 are double cylinder piers sitting on bedrock below the harbour bed. The main pier which supports the bascule span is Pier 4. It rests on four cylinders taken down to sandstone bedrock at a depth of between 45 to 75 feet (14 - 23m) which is 75 to 105 feet (23 - 32m) below mean sea level. The pier is box-like and supports all machinery for the operation of the bascule, including the operator's cabin.
Click here for a full history of the bridge on the RTA web site.
Condamine Street was named after Thomas de la Condamine, Aide-de-Camp to Governor Darling. 2
History:
| Dee Why to Neutral Bay | Neutral Bay to Dee Why | |||
| Preview: | Description: | Preview: | Description: | |
 |
Advance Directional Sign: Long line of Saturday afternoon traffic as you approach the Harbord and Warringah Road junction at Brookvale. September 2006. Image © Paul Rands |
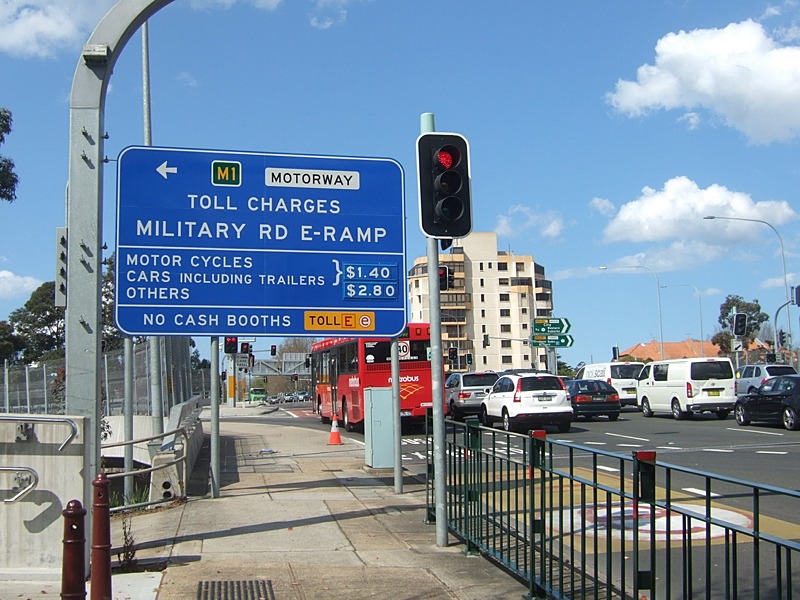 |
Toll Charges Sign: Toll charges sign for the Falcon St (Metroad 10) on ramp to Warringah Fwy (Metroad 1) at Neutral Bay. September 2010. Note the alphanumeric route number. Image © Michael Mak |
|
 |
Distance Sign: Southbound RD sign near Winbourne Road at Brookvale. September 2006. Image © Paul Rands |
|||
 |
Manly Creek: Southbound on Pittwater Road at North Manly. September 2006. Image © Paul Rands |
|||
 |
Unusual AD Sign: Diagrammatic sign denoting which streets to use to access local shops, southbound at Manly Vale approaching Koorala Street. September 2006. Image © Paul Rands |
|||
 |
Approaching Pittwater Road / Condamine Street Junction: Just north of the intersection of Pittwater Road and Condamine Street at Manly Vale. September 2006. Image © Paul Rands |
|||
 |
Pittwater Road / Condamine Street Junction: Intersection of Pittwater Road and Condamine Street at Manly Vale. September 2006. Image © Paul Rands |
|||
 |
Burnt Bridge Creek Deviation: Southbound approaching the southern end of the deviation that opened to traffic in 1985 approaching Sydney Road at Seaforth. September 2006. Image © Paul Rands |
|||
 |
Burnt Bridge Creek Deviation Aerial Shot: Photo from the front of a DMR publication of construction works for the Burnt Bridge Creek Deviation at Seaforth, 1984. Image © DMR, supplied by Tiptruck |
|||
 |
Ethel Street Underpass: Passing under Ethel Street, just south of the Sydney Road intersection at Seaforth as you make the approach to the Spit Bridge. September 2006. Image © Paul Rands |
|||
 |
Manly Road Southbound: The approach to the Spit Bridge at Seaforth, September 2006. Image © Paul Rands |
|||
 |
Unusual Opening Bridge Sign: Warning signals and opening bridge sign, southbound approaching the Spit Bridge at Seaforth. September 2006. Image © Paul Rands |
|||
 |
Spit Bridge: Southbound on the 1950s built Spit Bridge, just before the opening span over Middle Harbour. September 2006. Image © Paul Rands |
|||
 |
Approaching Parriwi Road: Looking southbound on Spit Road at The Spit. September 2006. Image © Paul Rands |
|||
 |
Southbound at The Spit: Heading up the steep and windy hill from the Spit Bridge. September 2006. Image © Paul Rands |
|||
 |
Southbound at The Spit: Heading up the steep and windy hill from the Spit Bridge. September 2006. Image © Paul Rands |
|||
 |
Southbound at The Spit: Heading up the steep and windy hill from the Spit Bridge. September 2006. Image © Paul Rands |
|||
 |
Approaching Spit Road / Military Road Junction: Approaching the intersection of Military Road and Spit Road at Mosman. September 2006. Image © Paul Rands |
|||
 |
Spit Road / Military Road Junction: The intersection of Military Road and Spit Road at Mosman. September 2006. Image © Paul Rands |
|||
 |
Unusual AD Sign: Diagrammatic sign denoting which streets to use to access Macpherson Street at Cremorne. Citybound on Military Road. September 2006. Image © Paul Rands |
|||
 |
Footbridge: Image © Paul Rands |
|||
 |
Lane Allocation Signals: Inbound at Cremorne approaching Wycombe Road. September 2006. Image © Paul Rands |
|||
 |
Advance Directional Sign: Large AD sign on Falcon Street at Neutral Bay. It has been coverplated for the Lane Cove Tunnel roadworks. September 2006. Image © Paul Rands |
|||
 |
Toll Charges Sign: Toll charges sign for the Falcon St (Metroad 10) on ramp to Warringah Fwy (Metroad 1) at Neutral Bay. September 2010. Note the alphanumeric route number. Image © Michael Mak |
|||
 |
Falcon Street / Warringah Freeway Interchange: Looking west at the terminus of Metroad 10 at Neutral Bay. September 2006. Image © Paul Rands |
|||
 |
Falcon Street / Warringah Freeway Interchange: Looking west at the terminus of Metroad 10 at Neutral Bay. June 2012. Image © Justin Cozart |
|||
| Click here for the continuation of Metroad 10 between Dee Why and Mona Vale | ||||
1 State Library of New South Wales:
2 Manly City Council:
3 Roads & Traffic Authority
4 Sam Laybutt
Last updated: 08 Nov 2019 01:09
This site © Paul Rands. All rights reserved. Some portions © (copyright) by their respective and credited owners. Permission must be obtained before using any images from this site. For details, please email by clicking here.