|
|
|
|
|

|
Pacific Highway, Gore Hill Freeway, Warringah Freeway, Sydney Harbour Tunnel, Cahill Expressway, Eastern Distributor, Southern Cross Drive, General Holmes Drive, The Grand Parade, President Avenue & Princes Highway (Metroad 1) - Artarmon to Sydney (Decommissioned) |
Statistics:
Route Numbering:


General Information:
Metroad 1 is basically a replacement of National Route 1 through the Sydney area, when Metroads were introduced to NSW in the 1990s. That said, the Metroad 1 route has had some changes to its routing since it was introduced.
The route is formed by several major roads in Sydney and carries large volumes of traffic daily. It consists of mostly suburban arterial road qualities, mostly 3 lanes in each direction. There are a few near freeway standard sections along the route. The Sydney Harbour Tunnel forms a section of underground roadway.
The Gore Hill Freeway, formerly part of Metroad 2, is 3.1 kilometres in length and links the Warringah Freeway at Naremburn with the Lane Cove Tunnel at Lane Cove. Originally the freeway linked with Epping Road. During construction 70 000 trees were used in the landscaping, more than was removed to build the freeway. 2
Formerly known as the Warringah Expressway, this section of Metroad 1 is one of Sydney's grander road engineering feats. It was originally designed to head through Sydney's north shore to the northern beaches.
The original plan for the Warringah Freeway was bigger than what the road is today. At its northern end, it was to turn north at Willoughby Road, through the SCEGGS playing fields, through Castlecrag and cross Middle Harbour at Sugarloaf Point / Pickering Point. From there it would continue north along the Wakehurst Pkwy. There was an EIS comissioned in 1963 for an interchange at Warringah Road & Wakehurst Parkway. There was also to be two spurs from Pickering Point into Balgowlah and another along Burnt Bridge Creek to join Condamine Street near Kenneth Road.
The Warringah Freeway also features adjustable lanes depending on traffic requirements. The western middle carriageway, which is usually northbound, becomes southbound during the morning peak (from 05:30 - 09:30). The time the change back occurs, depends on different traffic conditions. The eastern middle carriageway used to become northbound in the afternoon peak prior to 1987. This changed when construction of the Sydney Harbour Tunnel began. Because of the tunnel approach, this carriageway is now permanently southbound only.
Click here for an RTA Oral History file on the constuction of the Warringah Freeway (MP3 format, 4.35 MB)
The route features New South Wales first ever expressway, the Cahill Expressway built in the 1950s at Circular Quay. Stage 1 of the route features a dual deck, with roadway on the top and railway under, both passing over the Circular Quay ferry terminal on Sydney Harbour. 2 For a full history, with photos of the Cahill Expressway, click here.
The 2.3 kilometre Sydney Harbour Tunnel connects the Warringah Freeway on the northern side of Sydney Harbour to the Cahill Expressway, south of the harbour. It includes a one kilometre section below the harbour constructed by the immersed tube method. The Sydney Harbour Tunnel Company (SHTC) owns, operates and will maintain the Harbour Tunnel until August 2022 when it will be transferred to public ownership. 1
History:
| Sydney to Artarmon | Artarmon to Sydney | |||
| Preview: | Description: | Preview: | Description: | |
 |
Macquarie Street Split: Travelling under the landbridge at The Domain in Sydney, June 2007. Image © Paul Rands |
 |
Advance Directional Sign: AD sign approaching Gore Hill Fwy (Metroad 1), Lane Cove Tunnel (Metroad 2), Pacific Hwy (unnumbered) and Epping Rd interchange at Artarmon, November 2010. Image © Rob Tilley |
|
 |
Cahill Expressway: Approaching the Macquarie Street interchange in Sydney, December 2008. Image © Paul Rands |
 |
Advance Directional Sign: AD sign approaching Gore Hill Fwy (Metroad 1), Lane Cove Tunnel (Metroad 2), Pacific Hwy (unnumbered) and Epping Rd interchange at Artarmon, November 2010. Image © Rob Tilley |
|
 |
Macquarie Street Interchange: Macquarie Street interchange in Sydney, December 2008. Image © Paul Rands |
 |
Gore Hill Freeway: Intersection directional sign assembly at the on ramp to Gore Hill Fwy (Metroad 1), November 2010. Metroad 1 turns left at this interchange. Image © Rob Tilley |
|
 |
Macquarie Street Interchange: Macquarie Street interchange in Sydney, December 2008. Image © Paul Rands |
 |
Reserve Road Interchange: Eastbound on the Gore Hil Fwy at the Reserve Rd interchange in Artarmon, July 2013. Image © Paul Rands |
|
 |
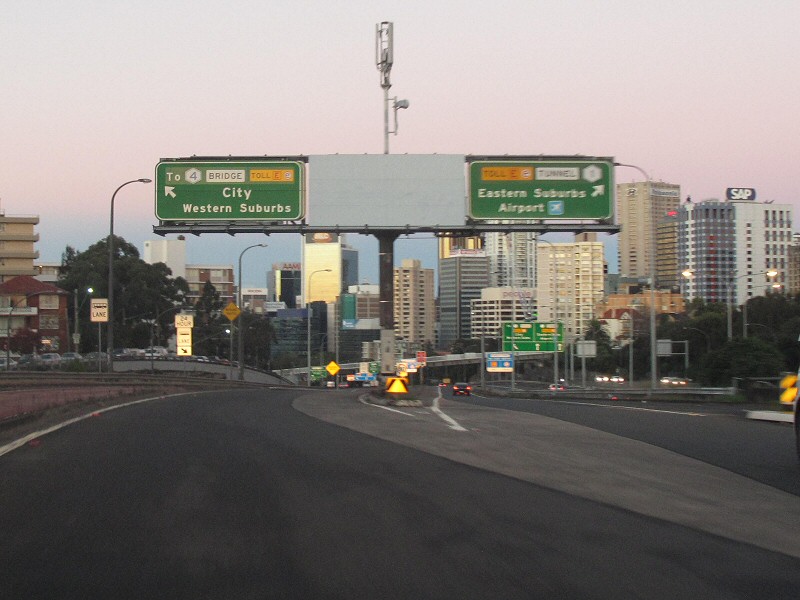
Cahill Expressway / Sydney Harbour Tunnel Interchange: Looking north in Sydney at the interchange with Cahill Expwy and Sydney Harbour Tunnel (Metroad 1), December 2008. Image © Paul Rands |
 |
Reserve Road Interchange: Eastbound on the Gore Hil Fwy at the Reserve Rd interchange in Artarmon, November 2010. Image © Rob Tilley |
|
 |
Entering The Sydney Harbour Tunnel: Northbound as you enter the Sydney Harbour Tunnel in Sydney. The Cahill Expressway splits off to the left of the shot, December 2008. Image © Paul Rands |
 |
Distance Sign: RD sign on the Hampden Rd overpass at Artarmon, November 2010. Image © Rob Tilley |
|
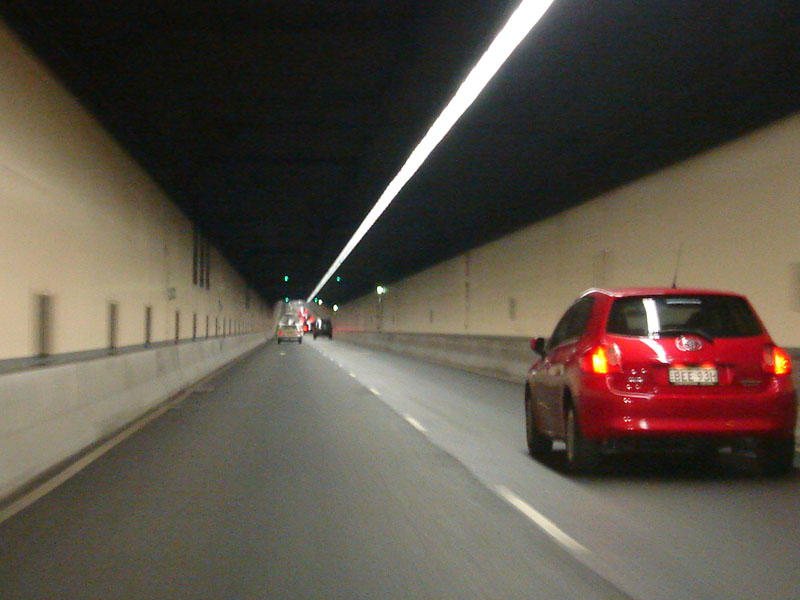 |
Sydney Harbour Tunnel: Inside the northbound tunnel, December 2008. Image © Paul Rands |
 |
Advance Directional Sign: Changeable AD sign over Warringah Fwy (Metroad 1) at Willoughby, November 2010. Image © Rob Tilley |
|
 |
Advance Directional Sign: AD sign just off the Sydney Harbour Bridge approaching the interchange with Lavender St and Pacific Hwy at Milsons Point, June 2012. Image © Justin Cozart |
 |
Advance Directional Sign: AD sign at Cammeray for Military Rd (Metroad 10) and Albert St North, July 2013. Image © Paul Rands |
|
 |
Supplemental Advance Directional Sign: Supplemental AD sign at the northern end of the Sydney Harbour Tunnel in North Sydney, December 2008. Image © Paul Rands |
 |
West Street: Warringah Fwy (Metroad 1) as it passes under West St at Cammeray, July 2013. Image © Paul Rands |
|
 |
Mount Street: Supplemental advance directional signs on the Mount St bridge for the Falcon & Ernest Street interchanges, Warringah Freeway, North Sydney, December 2008. Image © Paul Rands |
 |
Advance Directional Sign: Changeable AD sign on Miller St bridge over Warringah Fwy (Metroad 1) at Cammeray approaching Military Rd (Metroad 10), November 2010. Image © Rob Tilley |
|
 |
Advance Directional Sign: AD sign for the Falcon and Ernest Street interchanges, North Sydney, December 2008. Image © Paul Rands |
 |
Advance Directional Sign: Changeable AD over Warringah Fwy (Metroad 1) at Cammeray approaching Alfred St and Military Rd (Metroad 10), November 2010. Image © Rob Tilley |
|
 |
Falcon Street: Warringah Freeway at the Falcon St interchange at North Sydney, December 2008. Image © Paul Rands |
 |
Advance Directional Sign: Changeable AD sign on Ernest St bridge over Warringah Fwy (Metroad 1) at Cammeray, July 2013. Click here for a photo by Rob Tilley of this location from November 2010. Image © Paul Rands |
|
 |
Falcon Street: Warringah Freeway at the Falcon St interchange at North Sydney, December 2008. Image © Paul Rands |
 |
Advance Directional Sign: AD sign on Warringah Fwy (Metroad 1) near the Military Rd (Metroad 10) and Falcon St bridge at Neutral Bay, November 2010. Image © Rob Tilley |
|
 |
Advance Directional Signs: AD signs on the Falcon St bridge in North Sydney for the Miller St interchange, December 2008. Image © Paul Rands |
 |
Advance Directional Sign: Changeable AD sign gantry on Warringah Fwy (Metroad 1) at North Sydney, June 2012. Image © Justin Cozart |
|
 |
AD Sign: Northbound advance directional sign on the Warringah Fwy as you approach Ernest St at Cammeray, December 2008. Image © Paul Rands |
 |
Advance Directional Sign: AD sign approaching the Sydney Harbour Bridge (former NR1) at North Sydney, November 2010. Image © Rob Tilley |
|
 |
Miller Street Interchange: Exit gore ID signage at the Miller St interchange in Cammeray, December 2008. Image © Paul Rands |
 |
Advance Directional Signs: AD signs for Cahill Expwy, Sydney Harbour Bridge and Sydney Harbour Tunnel (Metroad 1), July 2013. Image © Paul Rands |
|
 |
Lane Allocation Signs: Northbound on Warringah Freeway at Cammeray at the Miller Street interchange, December 2008. Image © Paul Rands |
 |
Warringah Freeway: Southbound view of the Warringah Fwy from Falcon St in North Sydney, September 2010. Image © Michael Mak |
|
 |
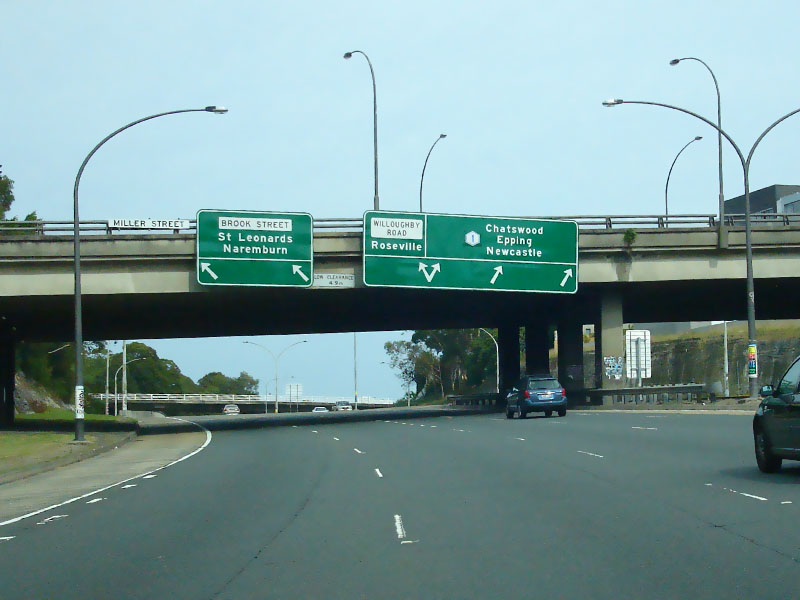
Brook Street Interchange: Warringah Fwy in Cammeray at the Brook St interchange, December 2008. Image © Paul Rands |
 |
Corner Of Arthur Street & Warringah Freeway: Left turn is the northbound on-ramp to the Warringah Fwy and right is Arthur Street, which can be used to access the southbound lanes of the freeway, September 2006. Image © Paul Rands |
|
 |
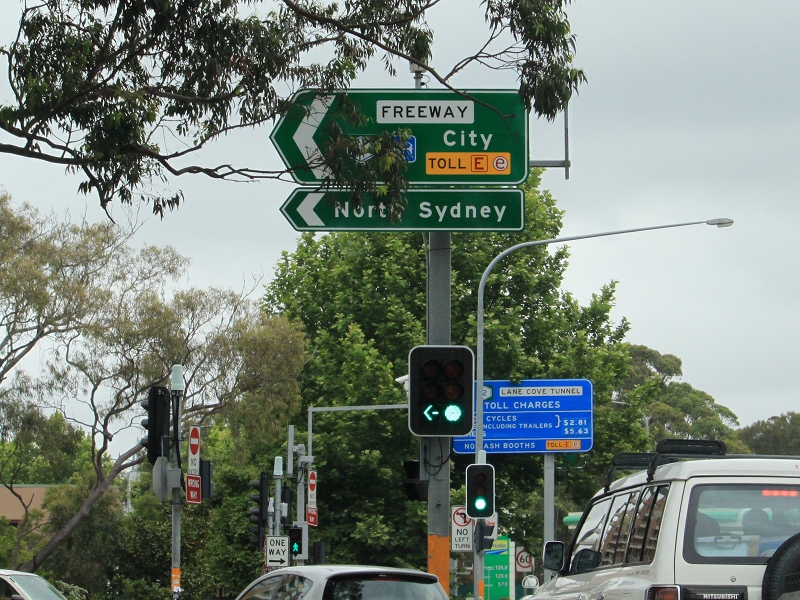
Willoughby Road Interchange: Warringah Fwy at the Willoughby Rd interchange in Naremburn. This was once where Warringah Fwy ended, December 2008. Image © Paul Rands |
 |
Advance Directional Sign: AD sign approaching the Sydney Harbour Bridge (former NR1) and Alfred St off ramp at North Sydney, November 2010. Image © Rob Tilley |
|
 |
Willoughby Road Interchange: Warringah Fwy at the Willoughby Rd interchange in Naremburn. This was once where Warringah Fwy ended, December 2008. Metroad 1 becomes Gore Hill Fwy from this junction. Image © Paul Rands |
 |
Toll Signs: Signs indicating lanes leading to tolled roads, Warringah Fwy at North Sydney, September 2010. Image © Michael Mak |
|
 |
Overheight Sign: Overheight vehicle warning sign for the Lane Cove Tunnel (Metroad 2) on Gore Hill Fwy in Naremburn. Willoughby Rd overpass is in the distance, December 2008. Image © Paul Rands |
 |
Cheangeable Advance Directional Signs: Changeable AD signs at North Sydney approaching Cahill Expwy and Sydney Harbour Bridge, July 2013. Metroad 1 continues to the right of the median pictured. Image © Paul Rands |
|
 |
Toll Charges Sign: Lane Cove Tunnel toll charges sign on Gore Hill Fwy at Naremburn. Note the uncovered M2 alphanumeric shield, it should be coverplated with a Metroad 2 shield, December 2008. Image © Paul Rands |
 |
Corner Of Arthur And Mount Streets: Southbound on Arthur Street on the lane used for accessing the southbound lanes of the freeway, September 2006. Image © Paul Rands |
|
 |
Dangerous Goods Sign: Sign on Gore Hill Fwy (Metroad 1) at Willoughby, warning of the prohibition of dangerous goods inside the Lane Cove Tunnel (Metroad 2), December 2008. Image © Paul Rands |
 |
Mount Street On Ramp: Looking east on the Mount Street overpass of the freeway, September 2006. Image © Paul Rands |
|
 |
Supplemental Advance Directional Sign: Supplemental AD sign on Gore Hill Fwy (Metroad 1) at Willoughby for the Reserve Rd and Pacific Hwy (Metroad 1) interchanges, December 2008. Image © Paul Rands |
 |
Mount Street: Warringah Expressway as it passes under Mount Street at North Sydney, July 2013. Metroad 1 continues to the right of the median pictured. Image © Paul Rands |
|
 |
Overheight Sign: Overheight vehicle warning sign for the Lane Cove Tunnel (Metroad 2) on Gore Hill Fwy in Artarmon, December 2008. Image © Paul Rands |
 |
Mount Street On Ramp: Southbound at North Sydney with the portal to the Sydney Harbour Tunnel on the left of shot, September 2006. Image © Paul Rands |
|
 |
Warning Signals: Warning signals on Gore Hill Fwy (Metroad 1) at Artarmon, which are used to signify Lane Cove Tunnel (Metroad 2) conditions, December 2008. Image © Paul Rands |
|||
 |
AD Sign: Variable advance directional sign on the Gore Hill Fwy approaching the Pacific Hwy interchange at Artarmon. June 2007. Image © Paul Rands |
|||
 |
Gore Hill Freeway / Lane Cove Tunnel Split: AD sign for the Pacific Highway interchange, approaching the Gore Hill Fwy (Metroad 1) / Lane Cove Tunnel (Metroad 2) split, December 2008. Image © Paul Rands |
|||
 |
Advance Directional Sign: AD sign on Gore Hill Fwy (Metroad 1) approaching Reserve Rd and Pacific Hwy (Metroad 1), December 2008. Image © Paul Rands |
|||
 |
Reserve Road Interchange: Gore Hill Fwy (Metroad 1) at the Reserver Rd interchange in Artarmon, December 2008. Image © Paul Rands |
|||
 |
Reserve Road Interchange: Gore Hill Fwy (Metroad 1) at the Reserve Rd interchange in Artarmon, December 2008. Image © Paul Rands |
|||
 |
Longueville Road / Pacific Highway Split: Approaching the end of the Gore Hill Fwy as the road splits off into Longueville Rd and Pacific Hwy (Metroad 1) at Artarmon, December 2008. Image © Paul Rands |
|||
 |
Longueville Road / Pacific Highway Split: End of the Gore Hill Fwy as the road splits off into Longueville Rd and Pacific Hwy (Metroad 1) at Artarmon, December 2008. Image © Paul Rands |
|||
 |
Pacific Highway / Gore Hill Freeway Interchange: On the corner of the offramp from the Gore Hill Freeway and the Pacific Highway at Artarmon, December 2008. Image © Paul Rands |
|||
 |
Pacific Highway / Gore Hill Freeway Interchange: On the corner of the offramp from the Gore Hill Freeway and the Pacific Highway at Artarmon, December 2008. Image © Paul Rands |
|||
| Click here for the continuation of Metroad 1 between Wahroonga and Hornsby Click here for the continuation of Metroad 1 between Sydney and Kyeemagh |
||||
1 Roads & Traffic Authority
2 City of Sydney
Last updated: 07-Jan-2017 0:12
This site © Paul Rands. All rights reserved. Some portions © (copyright) by their respective and credited owners. Permission must be obtained before using any images from this site. For details, please email by clicking here.